-
Folks, if you've recently upgraded or renewed your annual club membership but it's still not active, please reach out to the BOD or a moderator. The PayPal system has a slight bug which it doesn't allow it to activate the account on it's own.
You are using an out of date browser. It may not display this or other websites correctly.
You should upgrade or use an alternative browser.
You should upgrade or use an alternative browser.
Back wall Aquascaping
- Thread starter Dave
- Start date
I would asume that there might be a plexi stand that extends forward to balance it out under the substrate. Sort of like the other examples on the marco site. I could be wrong though. Thinking of doing one?
i believe some people use epoxy etc. it is VERY bouyant so if you decide to use a foam rock wall with great stuff. you want to use as minimal as possible. i used about 30+lbs on one and it floated like no tomorrow. if i would do it again. i would suggest using something to anchor it like pvc at the bottom attached to bottom portion and use sand to weigh down the bottom end to keep it from floating up.
SirFragalot said:Thinking of doing one?
Yes...was planning to put rubble rock on the screen, and create some mini shelves for coral placement.
My concern was the weight...since it will be rock.
Dave said:also would be interested if anyone knows where to source some of the plastic backing with the holes.
That looks like standard egg crate. You can get it any Home Depot or Lowes. They carry it in the fluorescent lighting section. It comes in a 2x4 sheet for about $10.
JohnS_323 said:That looks like standard egg crate. You can get it any Home Depot or Lowes. They carry it in the fluorescent lighting section. It comes in a 2x4 sheet for about $10.
Thank you kindly
Very nice Dave. I really like the way that looks. Do you have another one on the other side of the overflow? Any instructions? Pics? How did you secure it to the tank?
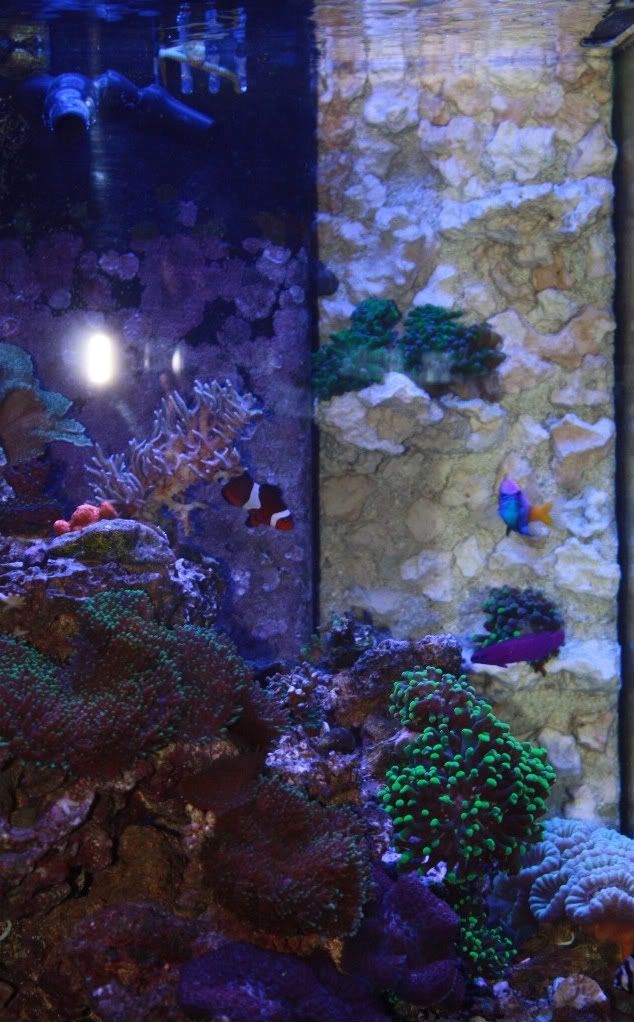
JRWOHLER said:That looks really good.I like how you put some frags on there already. Looks even better in the water then out, which had to make you happy.
Thanks. I was pretty happy when I had it out of the tank....then I put it in...and I was like Sweet!!!....it looks even better.
Definitely glad I decided to do this project.
any updates on the ' how to '?
wall looks nice--but was wondering
how much space between the back of the rock and the glass?
what about water flow behind the rock ? is there any?
can fish ,snail, crab get behind the rock wall and get trapped between the wall and the glass?
sure, the rock wall looks great in the tank but what happens if something gets behind there and dies?
would think that would cause a problem
just wondering
thanks for any info
steve
I built my second one and made a slight adjustment on the first wall. I hope to have them both installed this weekend.
The delays on the 'how to' were because I did not have enough pics from the first build to put something nice together. I took a lot more the second time.
Ultimately if all works out, there should not be any space between the rock and the glass, eliminating the concerns you mention.
The delays on the 'how to' were because I did not have enough pics from the first build to put something nice together. I took a lot more the second time.
Ultimately if all works out, there should not be any space between the rock and the glass, eliminating the concerns you mention.
Supplies:
Emaco R400
Quickcrete Acrylic Fortifier
Marco Rubble and Shelf Rock
Black Egg Crate http://www.eplastics.com/Plastic/Lighting_Diffusers/B-EGG-375X2X4
DAP Household/Aquarium Adhesive Sealant
Magnets http://www.magnet4sale.com/Neodymium-Magnets-N50-Dia-0.5-x0.25-NdFeB-Rare-Earth-Magnets.html
Aragonite Sand
Steps:
1. Measured space I was building wall for.
2. Used Dremel with diamond blade and grinder to cut the egg crate and smooth the edges.
a. I would suggest you place the plastic frame in the tank to verify it fits your initial measurements.
3. Placed sealeant into frame and then set magnets into sealant. Covered magnets with sealant.
4. Taped up sides of the egg crate to minimize concrete overflow onto sides.
5. Mixed a 1:1 water to acrylic fortifier solution into an empty one gallon distilled water jug.
6. Mixed solution with Emaco R400 and created an initial surface to build wall onto.
a. This was a lesson learned from my first wall, where I did not put down an initial layer. The first attempt, the back surface was not as even or clean due to sand falling into the crate holes. As a result I had to put on a back coat for the first wall.
7. Tape was removed and sides were cleaned with wet sponge, although minimal cleaning was required.
8. Cement was allowed to dry overnight.
9. Turn over rock wall to let excess sand fall off.
10. Re-taped sides
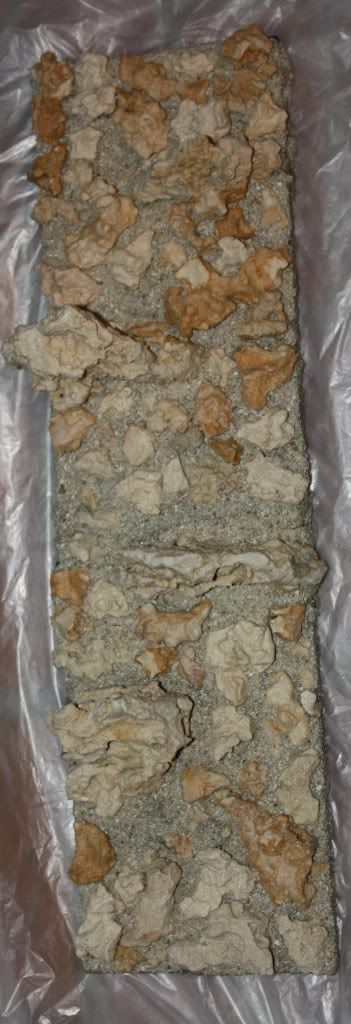
11. More cement mixed, and top and bottom shelfs were place on initial surface, small rubble rock placed if there was too much cement extending out from shelf. Aragonite sand was then scooped on top to cover the cement.
12. Remove tape and clean sides
13. Shelf was allowed to dry
14. Turn over rock wall to let excess sand fall off.
15. Re-taped sides.
16. More cement mixed and added to surface between the top and bottom shelf. Two center shelfs were placed as well as the rubble rock in between the shelfs. Topped with sand.
17. More cement mixed and added below the bottom shelf and above the top shelf. Rubble rock placed and topped with sand.
18. Remove tape and clean sides
19. Shelf was allowed to dry
20. Turn over rock wall to let excess sand fall off.
21. Wall was then placed in plastic bin with a powerhead, and was allowed to cure for several days.
22. Wall was added to tank which fit snuggly under top lip, and magnets were added to back glass to hold wall.
Pics


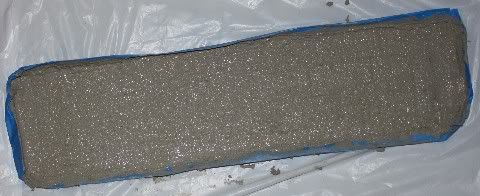


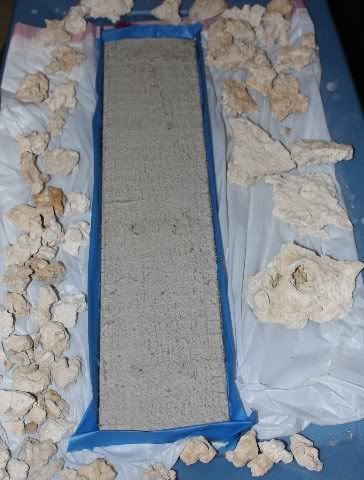
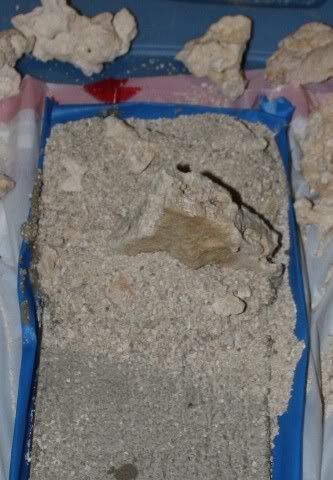


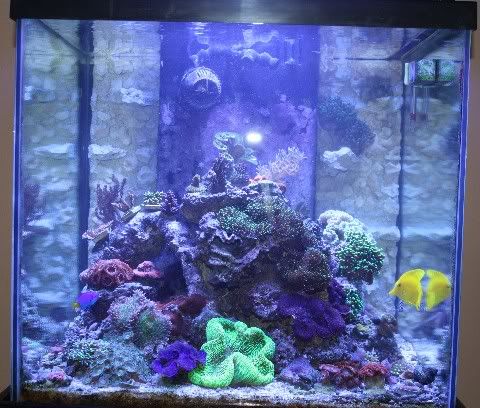
Lessons Learned:
1. Put an initial surface of cement down, and then build on top of it.
2. Measure carefully, I ended up having to dremel off some length and width due to a poor measurement. Internal overflow box was not level from top to bottom causing different width.
3. I would probably get stronger magnets. I may still get stronger magnets for outside the tank, but I can say even with out the magnets, the wall was very secure under the lip and I believe it would have stayed without issue.
Emaco R400
Quickcrete Acrylic Fortifier
Marco Rubble and Shelf Rock
Black Egg Crate http://www.eplastics.com/Plastic/Lighting_Diffusers/B-EGG-375X2X4
DAP Household/Aquarium Adhesive Sealant
Magnets http://www.magnet4sale.com/Neodymium-Magnets-N50-Dia-0.5-x0.25-NdFeB-Rare-Earth-Magnets.html
Aragonite Sand
Steps:
1. Measured space I was building wall for.
2. Used Dremel with diamond blade and grinder to cut the egg crate and smooth the edges.
a. I would suggest you place the plastic frame in the tank to verify it fits your initial measurements.
3. Placed sealeant into frame and then set magnets into sealant. Covered magnets with sealant.
4. Taped up sides of the egg crate to minimize concrete overflow onto sides.
5. Mixed a 1:1 water to acrylic fortifier solution into an empty one gallon distilled water jug.
6. Mixed solution with Emaco R400 and created an initial surface to build wall onto.
a. This was a lesson learned from my first wall, where I did not put down an initial layer. The first attempt, the back surface was not as even or clean due to sand falling into the crate holes. As a result I had to put on a back coat for the first wall.
7. Tape was removed and sides were cleaned with wet sponge, although minimal cleaning was required.
8. Cement was allowed to dry overnight.
9. Turn over rock wall to let excess sand fall off.
10. Re-taped sides
11. More cement mixed, and top and bottom shelfs were place on initial surface, small rubble rock placed if there was too much cement extending out from shelf. Aragonite sand was then scooped on top to cover the cement.
12. Remove tape and clean sides
13. Shelf was allowed to dry
14. Turn over rock wall to let excess sand fall off.
15. Re-taped sides.
16. More cement mixed and added to surface between the top and bottom shelf. Two center shelfs were placed as well as the rubble rock in between the shelfs. Topped with sand.
17. More cement mixed and added below the bottom shelf and above the top shelf. Rubble rock placed and topped with sand.
18. Remove tape and clean sides
19. Shelf was allowed to dry
20. Turn over rock wall to let excess sand fall off.
21. Wall was then placed in plastic bin with a powerhead, and was allowed to cure for several days.
22. Wall was added to tank which fit snuggly under top lip, and magnets were added to back glass to hold wall.
Pics


Lessons Learned:
1. Put an initial surface of cement down, and then build on top of it.
2. Measure carefully, I ended up having to dremel off some length and width due to a poor measurement. Internal overflow box was not level from top to bottom causing different width.
3. I would probably get stronger magnets. I may still get stronger magnets for outside the tank, but I can say even with out the magnets, the wall was very secure under the lip and I believe it would have stayed without issue.
JRWOHLER said:Two things> Looks great and very nicely detailed steps.
Thank you


