• Folks, if you've recently upgraded or renewed your annual club membership but it's still not active, please reach out to the BOD or a moderator. The PayPal system has a slight bug which it doesn't allow it to activate the account on it's own.

Build advice please - sump

Mark_C

Staff member
Officer Emeritus
NJRC Member
Moderator
Trying to design a sump for the new 90g build. I'm limited to items on hand. Fortunately I have a 30g and a load of 1/4" plexi.
I'd love to go custom but not an option atm, and a 30 is the biggest stock tank I can fit under the cabinet.
I'm running it for a 90g Deep Blue Reef Ready, which has the overflow and return in the back left corner.
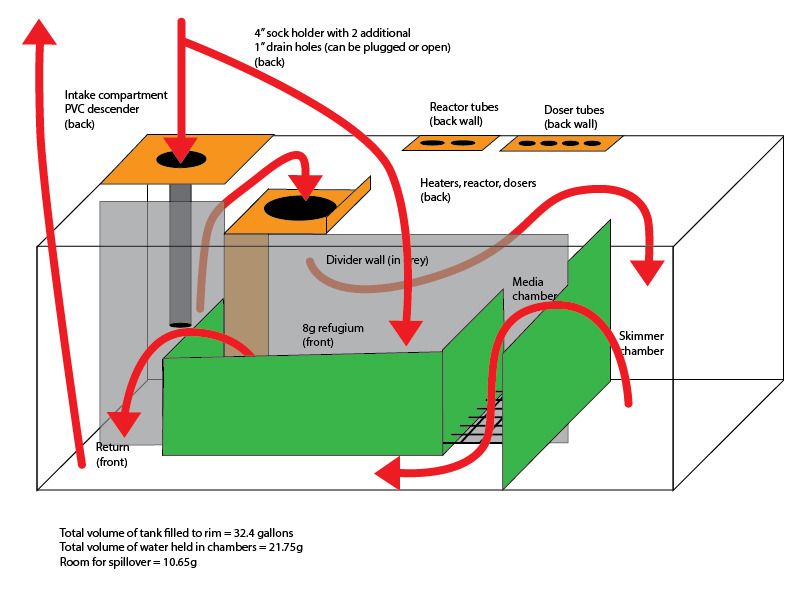
As such I figured I would try to build a sump where the water flowed in a U pattern, entering on the left and leaving on the left.
Spent a few hours and this is the first draft.

Overall concept of the design...
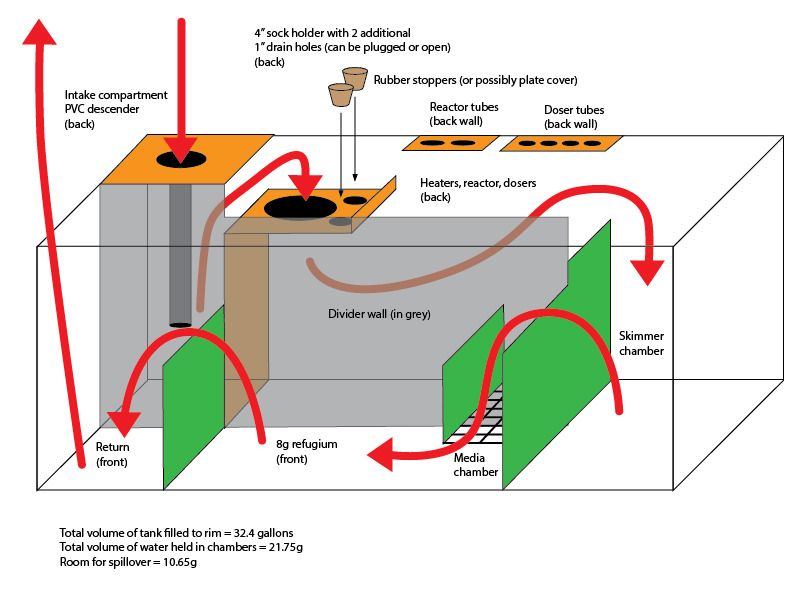
Overview_zpskthoambp.jpg


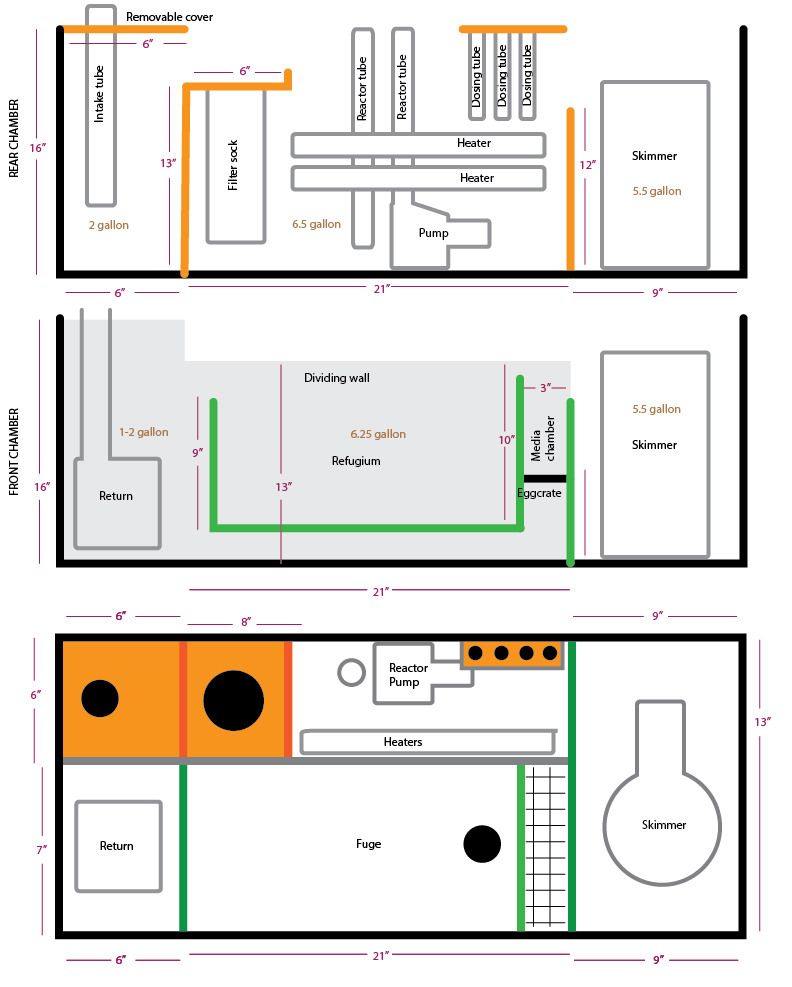
Rear chamber, front chamber, and top views of concept...
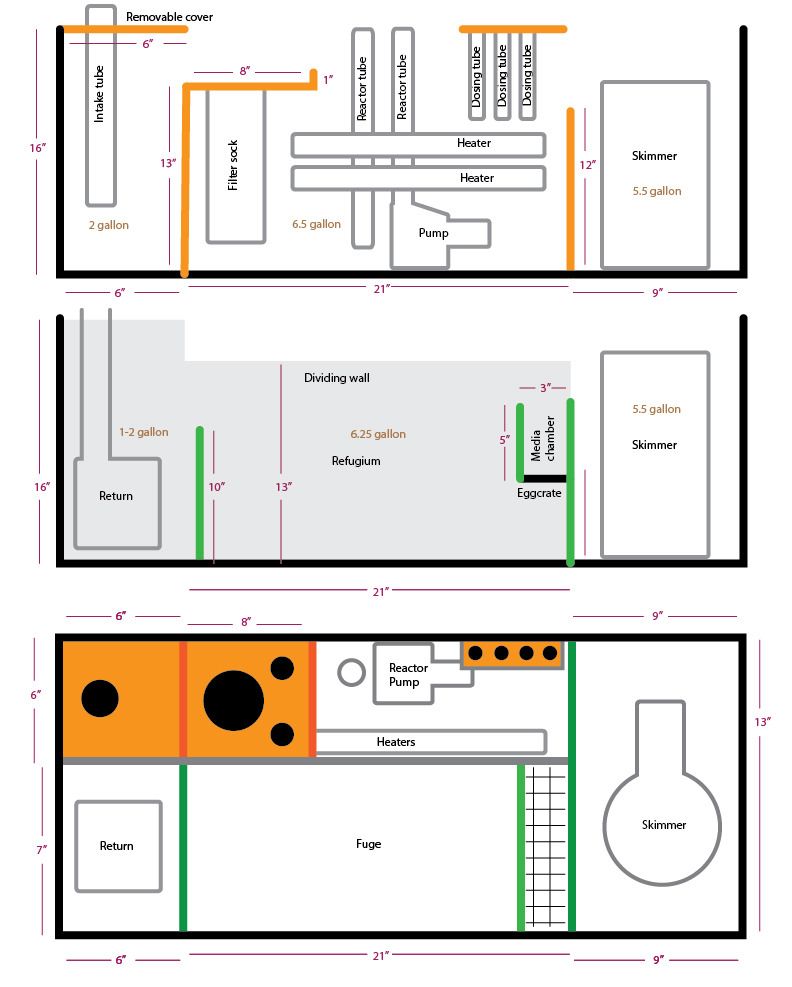
Fugecuts_zpsklpl35bz.jpg


This is the first unconventional sump I'm building. Would appreciate any comments, critiques, or advice.
 
You can save space by having the return chamber combined with filter sock area. Have the intake go right into the sock...save you 8 inches right there. I'd want the fuge before the skimmer to get exposed to dirtier water.
 
I would combine the intake compartment filter sock and skimmer into one 9"x13" chamber on the left. Have that chamber overflow into a 21"x13" refugium in the center. Then have your dosing & reactor inlets feed into the return pump chamber on the far right.
 

Mark_C

Staff member
Officer Emeritus
NJRC Member
Moderator
I would combine the intake compartment filter sock and skimmer into one 9"x13" chamber on the left. Have that chamber overflow into a 21"x13" refugium in the center. Then have your dosing & reactor inlets feed into the return pump chamber on the far right.
That was roundabout the initial plan, but having a current tank with both overflow and return on the left side, and not liking either running across the top of the tank, I wanted to try to design something with both chambers on the left, along with dedicated compartments for equipment. If it doesn’t work, I’ll undoubtably go back to the 3 chamber linear build.


You can save space by having the return chamber combined with filter sock area.
I’d like to avoid this as I usually don’t use a sock as I want to keep pod population up. Its also the reason for the two 1” holes in the sock platform.
Under normal circumstances It’ll run with no sock or plugs at all. If I need to scrub, as in post water change, I’ll drop in a sock in for a while while leaving the 2 1” holes open so there will be some filtering and some pods will get through. If I need to really scrub I’ll drop in a sock and plug the holes so everything is filtered.
I also like the fact that I can change the sock without having to remove the entire overflow tube.
But, saying that, you’ve given me thought on moving a few things around a bit.


I’d want the fuge before the skimmer to get exposed to dirtier water.
You'd want to do the fuge separate from the skimmer though because the pods and stuff will get chopped up by the skimmer.
Roger that. I’m now thinking of running a splitter from the overflow so I can run to both the intake and the fuge areas. I can then control at least a portion of the dirty water into the fuge, bypassing the skimmer, and saving some pods along the way. If I do this I may be able to eliminate the 1” holes on the sock holder.


Also I'd consider building a manifold to run the tank/reactors off 1 pump vs additional.
Was only planning 1 reactor but now that I think bout it, nothing stays singular for long in this hobby. Going to take this on board.

Thanks for the suggestions, seriously appreciated. Got a few new things brewing in the head now.
 

Mark_C

Staff member
Officer Emeritus
NJRC Member
Moderator
Moving ahead with this (sorta, at the moment)...

I'm unsure if I want the fuge to be fed by the skimmer chamber at all. So with some leads from Brando, found a way I can run the output from the skimmer chamber UNDER the fuge. To supply the fuge itself with dirty water I have the option to either run a direct overflow line to it, or I can cut through the center wall and put a valve on there so I can divert water from the 'heater chamber' into the fuge. Unsure if this water under the fuge diversion is going to happen, but if it does it will give me a considerable control over fuge parameters.
Lets see how it all works out in confusion tomorrow.

Fuge-overview2_zps1t0fo6pp.jpg


Here's the revised views...

Fugecuts2_zpsadewamhc.jpg


ALSO! Help please...

I've completed the rear compartment, which is drying atm. I used superglue for the joins on the plexiglass, which seems to be holding well enough.

To complete the seals on this fuge, two questions;

Is there an epoxy that I can use safely to reinforce the bonds? Is any epoxy OK once it's cured?

I'm planning, due to a bit of messy gluing and scratches while cutting the plexi, to coat the plexi pieces of the sump with a layer of clear Krylon (I know the black is reef safe once cured and have used it in the past, and on current build, for overflow tubes). Any thoughts on this? Other option is to use Goo-off and vinegar bath for a week or two after.

Thanks,

M
 

redfishbluefish

Officer Emeritus
Officer Emeritus
To answer your question about epoxy, I haven't met an epoxy that wasn't reef safe.

Now as far as using epoxy to "seal" the plexiglass (acrylic) partitions.....I'd be interest to see if this works. The reason is that acrylic swells and contracts in the presence of water. Not sure if a rigid adhesive, such as epoxy, will maintain that seal. It might just work, so I'm following.

Being anal retentive, if it were me, I'd use the epoxy and then once cured, cover it with GE Silicone I to seal the deal. But that's me!
 

Mark_C

Staff member
Officer Emeritus
NJRC Member
Moderator
I'd be interest to see if this works. The reason is that acrylic swells and contracts in the presence of water. Not sure if a rigid adhesive, such as epoxy, will maintain that seal. It might just work, so I'm following.
Being anal retentive, if it were me, I'd use the epoxy and then once cured, cover it with GE Silicone I to seal the deal. But that's me!

I'm using a fairly rigid 1/4" plexi. I'm building the plexi 'insides' of the sump as a drop in for the glass tank. Once this 'insert' is dropped into the 30L all edges of plexi that are in contact with glass will be roughed up considerably, in a back alley if need be, and said connections between the plexi and glass will be silicon.
The epoxy will be for the plexi to plexi connections of the insert. These bonds will be covered in silicon (the GE I picked up this morning) as well.
Great minds think alike. Undoubtably good looks and wit follow.
 

Mark_C

Staff member
Officer Emeritus
NJRC Member
Moderator
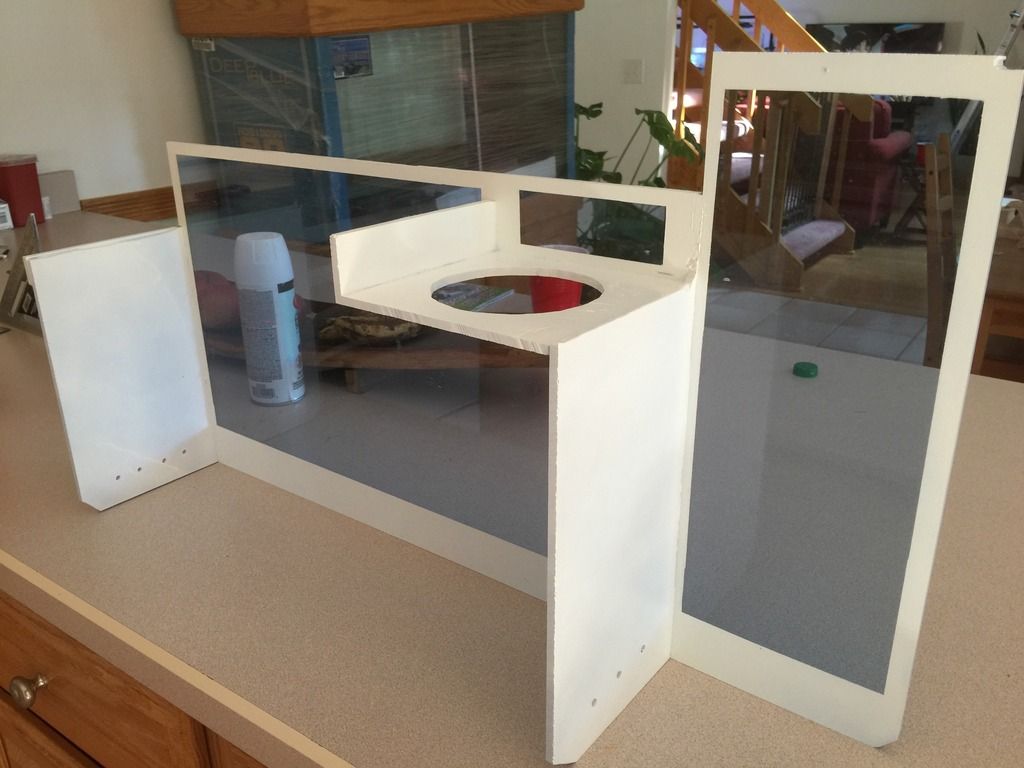
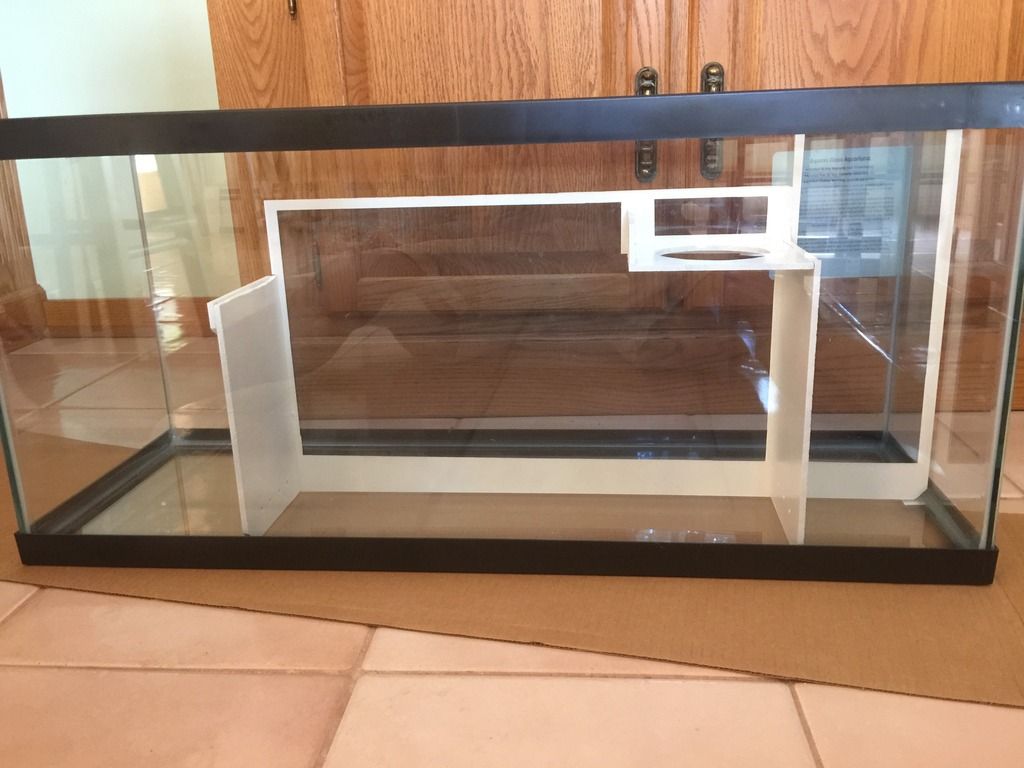
The initial cuts for the centerwall and rear compartment. For anyone cutting plexi - I used a 10" 200 tooth plastic blade on my tablesaw and went nice and slow. Worked fantastic but generataed a TON of small plastic shavings and created an odor so toxic that California won't let me near it. Open air and a mask advisable. The sock holder hole was hand Dremmeled.

a52iQ_zpsw1rj95p5.jpeg


Assembled and painted. Used the standard superglue gel on the roughened plexi, very secure, couldn't seperate the pieces without breaking them, so that worked well. Paint is Krylon Fusion for plastics. Painted some white borders as the plastic itself is bluish/bluegreen depending on the light. Figured the white would help any algae show up easier. Also added a few 1/4" holes at the bottom of each divider to allow some flow between chambers.

Cjs6l_zpsomdux1sf.jpeg


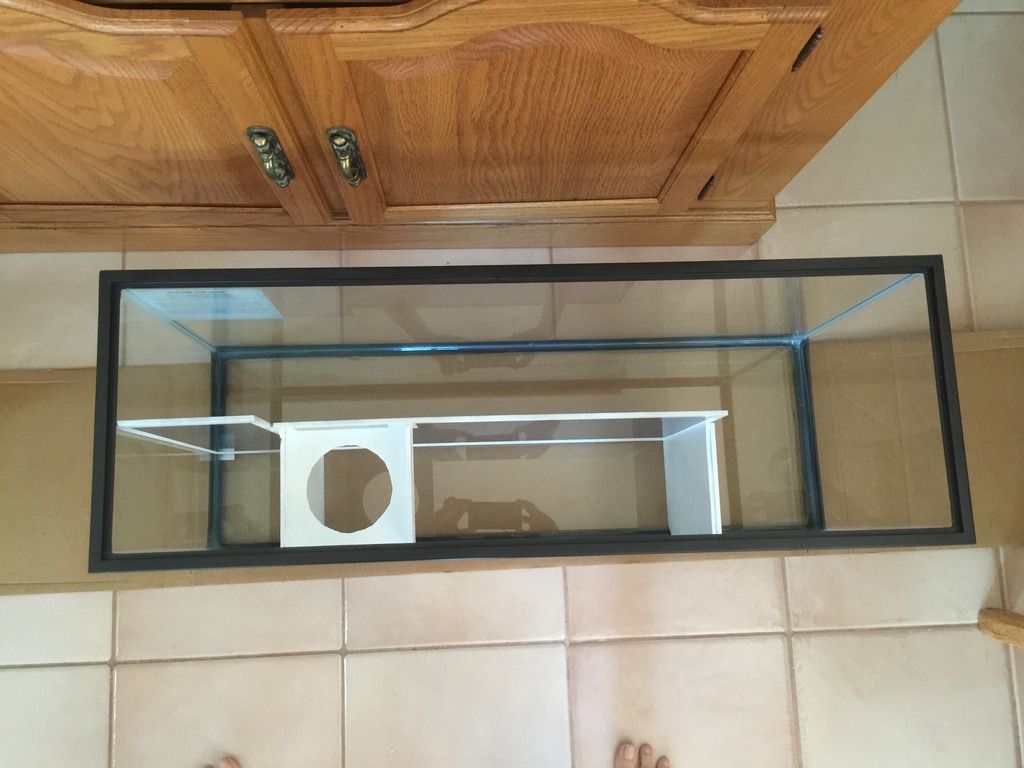
In tank (30L), top view. So, from the left - Overflow, sock holder, heater/dosing compartment, skimmer chamber. Water will then make a U turn into the fuge and return areas...

L1VIe_zpsdit2tjyb.jpeg


In tank side view...

xQjbQ_zps7skk7kfc.jpeg


Going to wait for this to cure a bit, silicone the joins, then silicone the entire unit into position in the sump. I'll then have to build the front compartment in the tank itself.
 

kschweer

Administrator
Staff member
Officer Emeritus
Moderator
Great job man!! Looks awesome.


Sent from my iPhone using Tapatalk
 
Top