• Folks, if you've recently upgraded or renewed your annual club membership but it's still not active, please reach out to the BOD or a moderator. The PayPal system has a slight bug which it doesn't allow it to activate the account on it's own.

DIY Float Switch on the Cheap

redfishbluefish

Officer Emeritus
Officer Emeritus
My wife always complains that I'm cheap, and still have my Communion money. Here is my shot at a DIY for a float switch with minimal expendature. Note that this could be used for an ATO by simply adding a small pump, such as a Tom's Aqualifer. I will give as much detail as I can, including were I purchased and how much I paid. This is a work in progress, so I'm hoping it works when I get done. The disclaimed is that I know as much about brain surgery as I do about electronics....you've been warned. :D

To start this project off I ordered/purchased the following items:

Double Pole Relay from Amazon..............................................$3.25 (free shipping)
Float Switches from eBay..........................................................$1.00 (free shipping)
Electrical Box for Home Depot.................................................$1.28 (tax included)

I actually purchased five of the float switches, but for this project, I'm only using one (for now). If you're building an ATO, I'd highly recommend using two float switches connected in series, with one float switch slightly higher than the other. This "higher" switch is the secondary fail switch when the first one fails.....and it will fail!

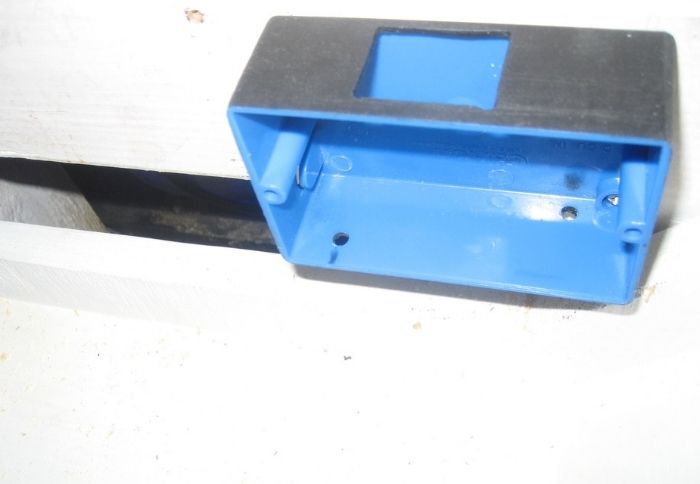
The first thing I did was make a project box for the relay. I used an inexpensive plastic electrical box from HD.
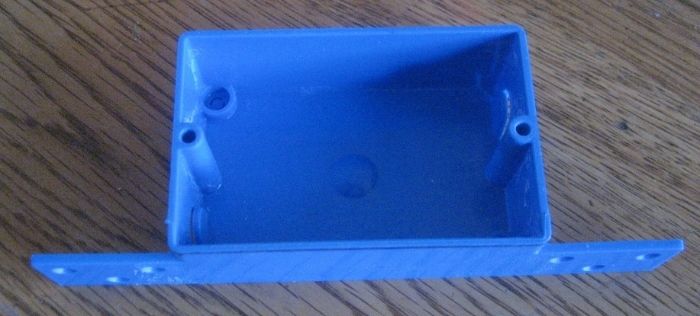


I cut off the tails, and using a scrap pieces of acrylic, made a cover for the box. Now the relay doesn't fit into this box, but the only thing I need to protect are the electrical contact screws from my fat fingers....especially the 110 volt side. :eek:


So to make it fit in the box, I cut a hole in the side to fit the relay itself. This reminded me of the audio freaks I know who have tubed amplifiers where the tubes are exposed. They are under the belief that their crappy human ears can distinguish the oh-so-slightly improved sound quality.

With a shot of my favorite black spray paint (98 cents a can), here's the project box with relay.


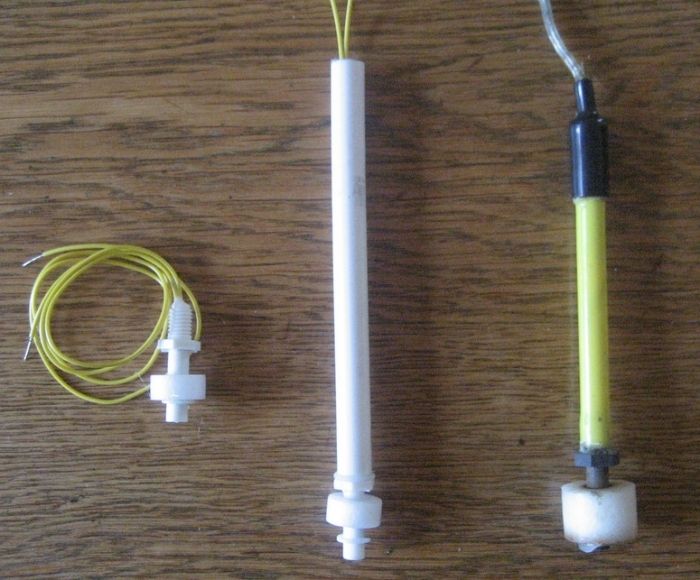
For the float switch, the old one was on a rod portion, and attached with a screw clamp. To replicate this rod portion, I took the fattest plastic hanger I could find and cut it up. To my surprise, part of the inside already had a hole. Using a long bit (masonry hammer bit), I finished drilling the center of the rod. I then drilled and tapped the one end of the rod to fit the float switch. The threading was M8-1.25 (metric). I don't have metric drills, but the 17/64 inch (0.26563"), bit was close enough to the required 0.26378 inch hole that was needed. From left to right, the new float switch, the new float switch attached to a piece of hanger rod, the old float switch.


I'm at a stand still right now because the numbering on the relay plug is different from what I'm use to......and the battery in my multimeter is dead to figure out the arrangement. TO BE CONTINUED!

Expenditure so far.......$5.53. If you want to include the paint (I had that sitting around, and it only took a squirt), add another $0.98.
 

Trio91

Administrator
Staff member
Moderator
i would be interested in seeing this operate as an ATO. i am actually in the market for a second one....id rather do a DIY version for my basement franken-tank than drop $150+ on a new one
 

redfishbluefish

Officer Emeritus
Officer Emeritus
Marcus, everything you've seen so far is ATO applicable.....especially what you're about to see.....dual float switches. What you are seeing is very similar to what you'd get with an AquaHub Premium Kit for about 40 bucks.


Well, that didn't last long! I decided to splurge and spend a whole buck on a second back-up float switch.

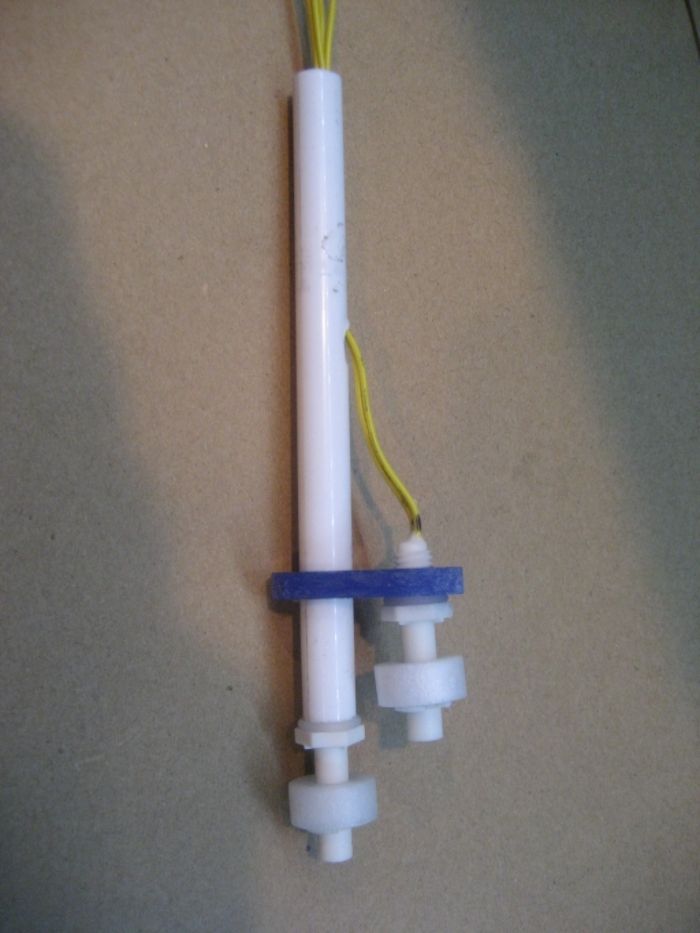
Using scrap acrylic, made a little bracket to hold a second float. Angle drilled into the rod to run the wires.


I'll be using this particular setup on the skimmate container to assure it won't overflow....if and when my skimmer goes nuts. The time I've had the skimmate container (about 3 years), the float switch has only been used once. But for an additional dollar, why not have the backup.
 
Last edited:

redfishbluefish

Officer Emeritus
Officer Emeritus
With @trio99 questioning use for an ATO, I gave some thought to the skill and tool requirement. So far I've used my drill press, cut off saw, power rasp, small hand saw, file, drill bits, taper bit, and metric tap and die kit. I realize I'm the oddball with the tools, so as an alternative, the AquaHub Premium kit is a good second choice. It's still semi-DIY, but requiring minimal tools. HERE's the link to that kit.....also note the disclaimer on their site, especially if you're not comfortable with electricity. With this kit, you will still need an outlet box, cover and plug along with a pump....Tom's Aqualifter for ca $15 works well. Hope this helps with those who are not as crazy with the tools.
 
Last edited:

redfishbluefish

Officer Emeritus
Officer Emeritus
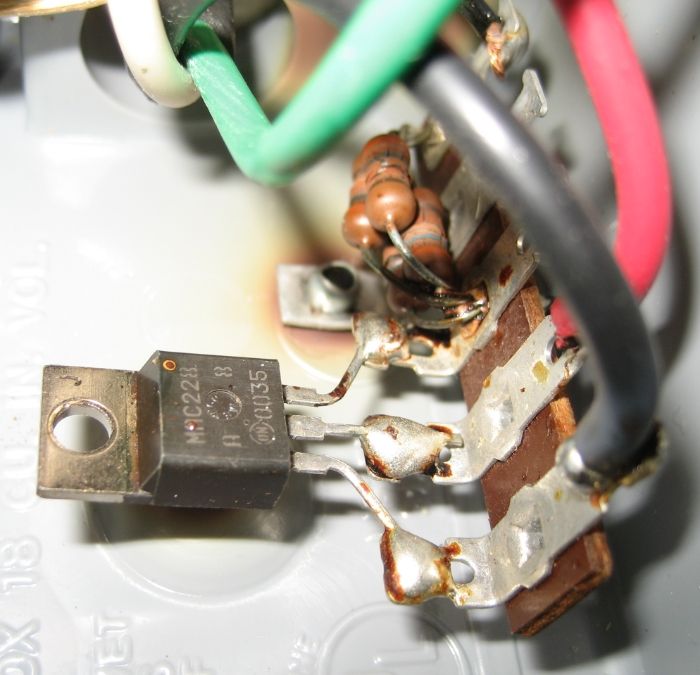
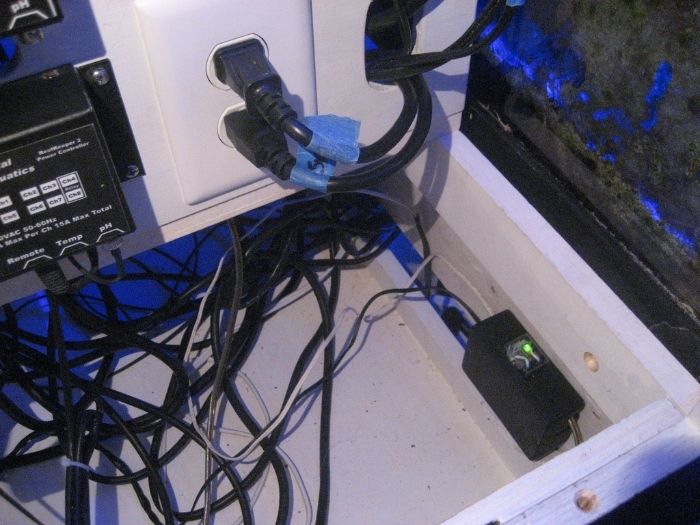
As I had mentioned, this float switch is for a DIY Skimmate Container I made about three years ago. To add a little back-story, the original float switch didn't have a relay associated with it. It had some crazy electronics that were way above me (That's easy to do.) Maybe some of the electrical folks could figure this out, but here's what I had:


The speaker wire went to the float switch, and that outlet was for the skimmer. If the float switch was activated, the skimmer pump stopped. Here's a close up of that mess:


What has caused for me to change this float switch arrangement is that the Atman pump on my skimmer died, and in the process blew the 15 amp fuse in the ReefKeeper. In the process it must have also cooked something in the float switch department, because it no longer worked. Instead of trying to figure out these unknown electronics (to me), I decided to go for a whole new float switch assemble....something that I understood (with a relay).

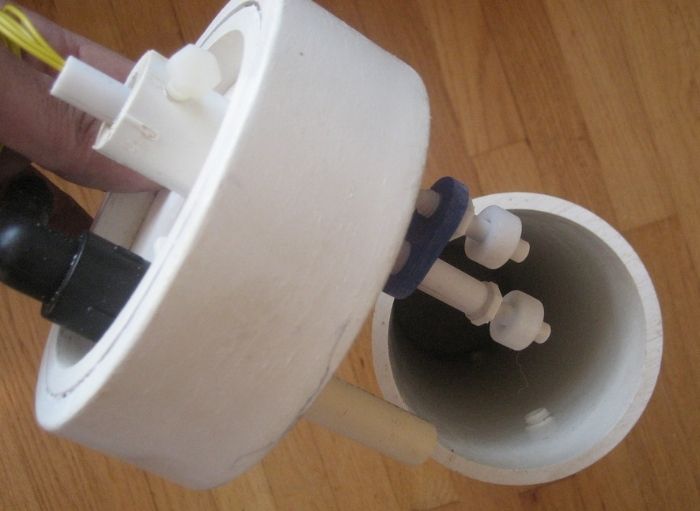
Now back to present day , I wanted to make sure the new float switch assembly would fit without interfering with the sides of the skimmate container and drain tube.


Like a glove! I must say, sometimes the serendipity of my designs even impress me! Hold on one moment while I reach around and pat myself on the back. I'm very happy with how this turned out and glad I included the second float switch. Someone recently posted about "Chinese" float switches, and I feel a little better knowing I have the back-up.

Now I need a battery to get my multimeter going to continue this journey.
 

redfishbluefish

Officer Emeritus
Officer Emeritus
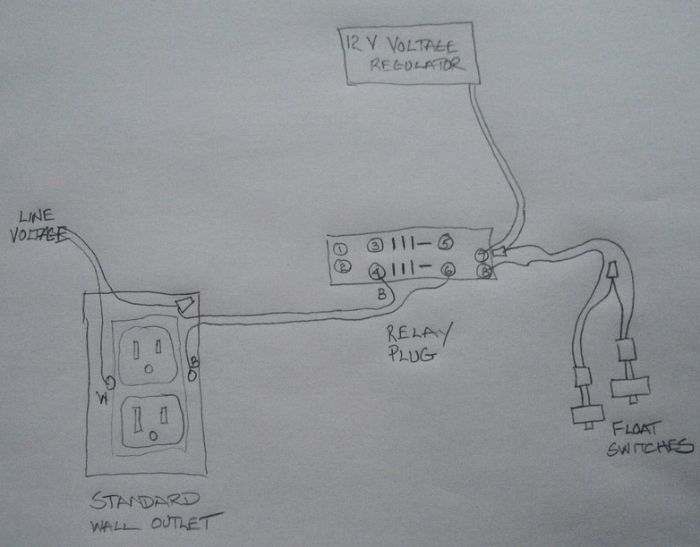
With the multimeter now working, I believe it is the numbers on the relay plug that are important, not the physical locations of the screws/connectors. So connection 7 and 8 are the coil, even though on this plug they are the most "right" connectors. With this now known, here's my wiring diagram. Note I am using a regular wall outlet to use to plug in what I wish to control. In my case it's a skimmer. If you were making an ATO, you'd plug the reservoir pump into this outlet. Hope this diagram is understandable.


The small little trapezoid shapes are wire nuts.
 

redfishbluefish

Officer Emeritus
Officer Emeritus
Hit another brick wall today....I have a shoe box of power supplies (wall warts), and would have sworn I had a 12 v in the box.....to run the relay coil. No luck! So I just ordered one and hopefully it will be here in 3 to 4 days. Another $2.95 spent, for those keeping count.

However, I still got a couple things done. Using shrink tubing, I soldered the float switches in series and covered with the tubing. My diagram shows a wire nut, but instead I soldered it up and covered with the shrink tubing.....looks cleaner.


I also drilled the holes for the wiring going into the project box, and mounted that inside the equipment stand. The slot you see below and to the left is where the skimmate container sits. For those following my tank build HERE, this is in the Belly of the Beast.


I also wired up the relay for the 120 V side, and tinned all stripped wire ends. In addition, I cut out the old burnt up electronics from the outlet box, from the old float switch. When the power supply arrives, I'm all set to simply put it in and close up the box.
 
Last edited:

redfishbluefish

Officer Emeritus
Officer Emeritus
Kevin, I have no idea what I'm doing.....seat of the pants electronics for me!


I just so happen to look up the specific spec sheet on the relay I'm using.......HERE.

To repeat my first post, I don't know electronics, and was told that polarity doesn't matter with the relay....positive and negative leads could be switched, and everything would still work. Well the data sheet shows post/screw #8 as being positive. So when the power supply gets here, that's how it's going to be hooked up. Now who was that person who told me it doesn't matter which way they get hooked up? I do wish I knew what I was doing.

Otherwise, everything is all done, waiting for the power supply to arrive. The float switch is mounted in the skimmate container and one wire attached to the relay (post #7); Outlet all wired and closed up; relay wired for 120V......all done. Here's the skimmate container:


Here's the tally of expenditures so far

Double Pole Relay from Amazon..........................................$3.25 (free shipping)
Float Switches from eBay (x2)..............................................$2.00 (free shipping)
Electrical Box for Home Depot.............................................$1.28 (tax included)
Power Supply from eBay.......................................................$2.95 (includes shipping)
Miscellanous**....................................................,.................$3.00
TOTAL...................................................................$12.47
**Miscellanous - this is a guess of the value of the stuff I already had....shrink tubing, screws, acrylic, etc.
 

redfishbluefish

Officer Emeritus
Officer Emeritus
Finishing it Up

The wall transformer arrived today and this was the last piece needed to finish up this little DIY. The positive side of the 12v transformer was attached to terminal #8 on the relay, and the negative was wire nutted to the remaining float switch wire.

Unexpectedly, this relay has an LED in it that is lit when the float switches are "open." With me cutting the project box to expose the relay, I might have put this some place were it would be visible. After wiring everything up, the project box was mounted. Here you can see the relationship to the project box (lower right), to the outlet plugs for the skimmer (and biopellet reactor)....the white outlet plug setup.


When the shelf is installed in the equipment cabinet, the project box/relay will not be seen.


FINAL ANALYSIS

So I wanted to see how cheap I really was with this build....since it's titled "on the cheap." Since AquaHub sells the parts to build your own, I used them to compare the price of my build. Note that I have not included shipping for the AquaHub prices. (Also note that I could buy their AquaHub Premium kit for less than the price of these individual parts...that are included in that kit.... for $39.95)

..........ITEM................................................DIY................AquaHub
Double Pole Relay/Socket.......................$3.25 .................$12.98
2 Float Switches......................................$2.00..................$13.98
Project Box .............................................$1.28................ ...$7.39
12V Wall Transformer............................$2.98....................$7.59
Miscellaneous.........................................$3.00....................------
TOTAL........................................$12.47..............$41.94


Not bad....roughly $13 verus $42....so for approximately a third of the cost you could have a float switch.

Now I didn't include labor. If I were to use the last job I had....consultant for the pharmaceutical/medical device industry......at my charge out rate.....labor would come to about $2000. So for a mear $2012.47 this float switch could be yours! :eek: What a bargain. :D


EDIT TO ADD: It just hit me! DOH! The reason they wanted you to hook positive to terminal #8 is because of the LED that's in the relay.....LED's need to be hooked up with the correct polarity. That's why it was important with this relay.
 
Last edited:

redfishbluefish

Officer Emeritus
Officer Emeritus
So I've received a couple PM's about the use of a relay, eliminating it all together, and tonight, the wiring. I wanted to resurrect this post to comment about the use of a relay.

What a relay does in this application is switch on and off the 110 volt supply by only using the 12 volt DC current coming out of the wall transformer. So the float switches are only "seeing" 12 volts DC. When the float switches are activated, they either turn on or off the 120 volts.

Can you run 120 volts through a float switch. The answer is yes....but you should be using one that is truly made for 120 volts...costing 50 plus dollars a piece. Even though the couple buck float switches you buy might be labeled as being able to take 120 volts, I wouldn't push that voltage through those knowing that if they fail (and they will) they might be putting that voltage in your tank.

Stick with using a relay if you want to control some 120 volt piece of equipment. Your tank will be happy for that. :D
 

redfishbluefish

Officer Emeritus
Officer Emeritus
Thanks James....this was a fun little project. It evolved as I put it together and was unsure if it would work in the end. All worked out!

And @Canadia_eh , I agree....I just vinegar soaked my float switches used for my ATO on my DT. Need to clean them occasionally. Of course, a week or so after cleaning, I had to replace the primary float switch on that unit.
 
My wife always complains that I'm cheap, and still have my Communion money. Here is my shot at a DIY for a float switch with minimal expendature. Note that this could be used for an ATO by simply adding a small pump, such as a Tom's Aqualifer. I will give as much detail as I can, including were I purchased and how much I paid. This is a work in progress, so I'm hoping it works when I get done. The disclaimed is that I know as much about brain surgery as I do about electronics....you've been warned. :D

To start this project off I ordered/purchased the following items:

Double Pole Relay from Amazon..............................................$3.25 (free shipping)
Float Switches from eBay..........................................................$1.00 (free shipping)
Electrical Box for Home Depot.................................................$1.28 (tax included)

I actually purchased five of the float switches, but for this project, I'm only using one (for now). If you're building an ATO, I'd highly recommend using two float switches connected in series, with one float switch slightly higher than the other. This "higher" switch is the secondary fail switch when the first one fails.....and it will fail!

The first thing I did was make a project box for the relay. I used an inexpensive plastic electrical box from HD.


I cut off the tails, and using a scrap pieces of acrylic, made a cover for the box. Now the relay doesn't fit into this box, but the only thing I need to protect are the electrical contact screws from my fat fingers....especially the 110 volt side. :eek:


So to make it fit in the box, I cut a hole in the side to fit the relay itself. This reminded me of the audio freaks I know who have tubed amplifiers where the tubes are exposed. They are under the belief that their crappy human ears can distinguish the oh-so-slightly improved sound quality.

With a shot of my favorite black spray paint (98 cents a can), here's the project box with relay.


For the float switch, the old one was on a rod portion, and attached with a screw clamp. To replicate this rod portion, I took the fattest plastic hanger I could find and cut it up. To my surprise, part of the inside already had a hole. Using a long bit (masonry hammer bit), I finished drilling the center of the rod. I then drilled and tapped the one end of the rod to fit the float switch. The threading was M8-1.25 (metric). I don't have metric drills, but the 17/64 inch (0.26563"), bit was close enough to the required 0.26378 inch hole that was needed. From left to right, the new float switch, the new float switch attached to a piece of hanger rod, the old float switch.


I'm at a stand still right now because the numbering on the relay plug is different from what I'm use to......and the battery in my multimeter is dead to figure out the arrangement. TO BE CONTINUED!

Expenditure so far.......$5.53. If you want to include the paint (I had that sitting around, and it only took a squirt), add another $0.98.
Is that a 12v or 120v relay?
 

MadReefer

Vice President
Staff member
NJRC Member
Moderator
My wife says I'm cheap as well. When I made the drippers she said go but whatever I need.
 

redfishbluefish

Officer Emeritus
Officer Emeritus
Is that a 12v or 120v relay?
Let me try this answer and see if it's understandable. It's a 12 volt relay that turns on and off 120 volts. Think of it as a switch and the 12 volt side turns that 120 volt switch on and off. Hope that helps.

And just to clarify from the other post, the 12 volts isn't there to run a pump, that's what the 120 volts is for. The 12 volts (and it's DC) is there for the float switches and turning on and off the 120 volts.
 
Last edited:
Let me try this answer and see if it's understandable. It's a 12 volt relay that turns on and off 120 volts. Think of it as a switch and the 12 volt side turns that 120 volt switch on and off. Hope that helps.

And just to clarify from the other post, the 12 volts isn't there to run a pump, that's what the 120 volts is for. The 12 volts (and it's DC) is there for the float switches and turning on and off the 120 volts.
I got you, im asking becuase i want set up a float switch to shut off my return pump if the siphon from my over flow break, i have a 12v dc relay, the float switch, but never found a way to hook it up since no one talk about hooking up the 12v (dc) relay to 120 volts. Thanks for the input, very cool your project by the way
 
I've built one myself and used it on my previous setup for almost 2 years and it never failed, I'm currently using the Tunze on my new setup and it has failed like 4 times in less than 2 months due to the optical sensor getting dirty.
I've been thinking about switching the Tunze for my DIY one since I still have it.
When making your own try getting a good quality float switch to make it more reliable.
 
Top