• Folks, if you've recently upgraded or renewed your annual club membership but it's still not active, please reach out to the BOD or a moderator. The PayPal system has a slight bug which it doesn't allow it to activate the account on it's own.

DIY Skimmate Container

redfishbluefish

Officer Emeritus
Officer Emeritus
PREFACE

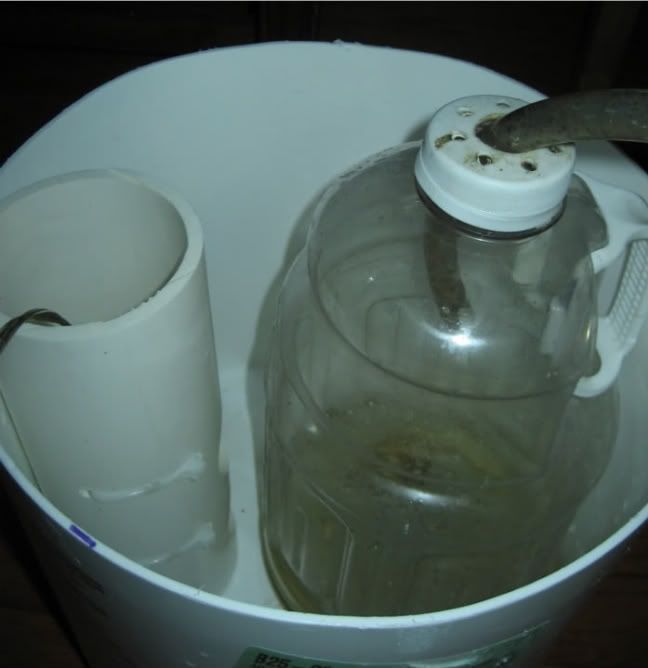
I currently collect my skimmate in a one gallon fruit juice container that sits in a cut-down five gallon salt bucket that contains a float switch to kill the skimmer if the fruit juice container overflows. Functional, but big and ugly.
IMG_5261.jpg


I looked into purchasing a commercial skimmate container, but was shocked to see them at $150 - $200 for a piece of pipe with two ends and a float switch. So to the shop I went….but first to Home Depot (and Lowe’s).


PARTS

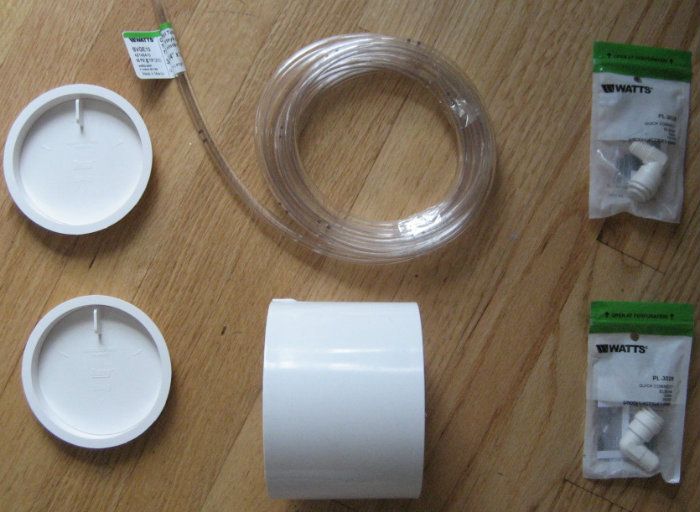
18¾” - 4” PVC Pipe ------------------------(have)
2 - 4” Knock-out Test Caps ---------------$0.36/each
2 - 3/8 Ouick Connect Elbow x ¼ NPT -----$2.38/each
10ft - 3/8 OD Clear Vinyl Tubing -----------$3.11
1 - 4” DWV Coupling ----------------------$2.32
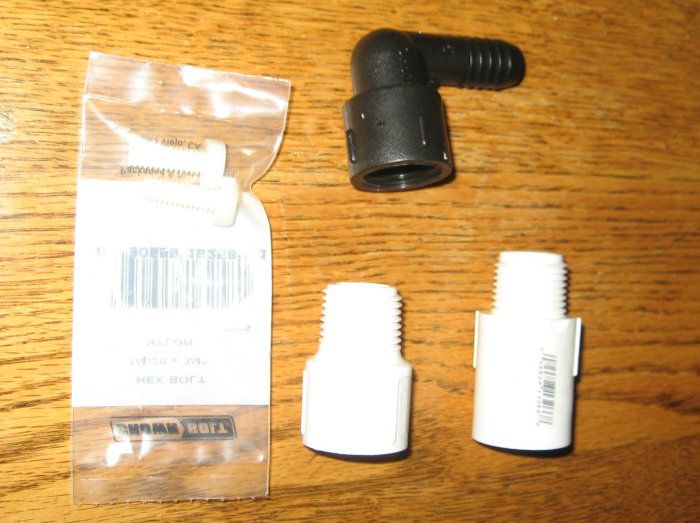
1 - ½” Female NPT Elbow with ½ Barb -----$0.94
1 - ½” Extender (Lowes) ------------------$0.66
1 - ½” Extender (HD) ---------------------$0.66
2 - ¼ x ¾ Nylon Hex Bolt -----------------$0.67
1 - Float Switch (120V) -------------------(have)
PVC Cleaner and Glue ---------------------(have)
TOTAL (without tax) ---------------------$13.18
PartsA.jpg

PartsB.jpg


THE BUILD (Base Container)

I cut the 4” pipe at 18 ¾” because this was close to the level of the 40 breeder sump I have. This calculates out to a total volume of a tad more than one gallon, if it was filled right to the top. I began by drilling two 7/16 holes for the sight tube three inches down from each end (that eventually would be tapped for the ¼ npt fittings). I didn’t put these holes right at the very top and very bottom because I wanted to leave room if I wanted to put some kind of restraint to hold this thing upright. I then glued the knock-out cap to the bottom of the pipe.

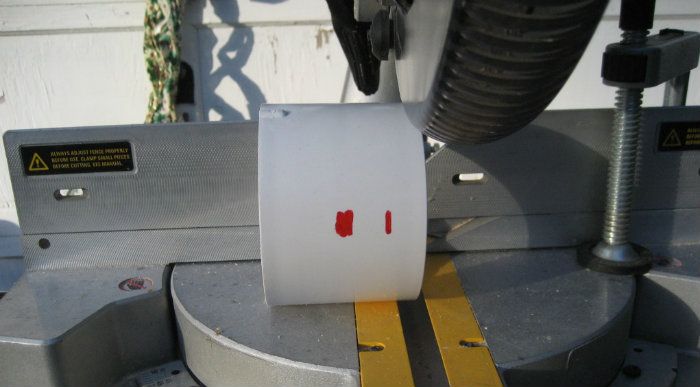
I now cut the coupling into three sections; approximate a quarter of the coupling; and then a second quarter making sure to eliminate the center “stop” portion. The remaining half was cleaned up to eliminate that “stop” portion as well….this part will become the top, while one of the quarters will be used to add support to the base:
Coupling.jpg


One of the quarters was glued to the base to add additional support.

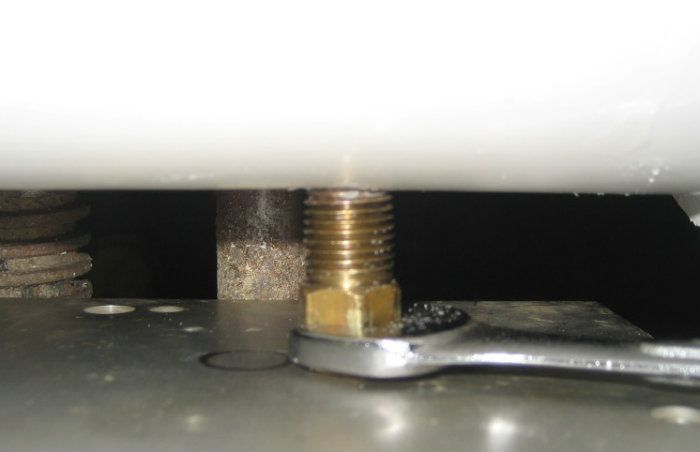
I was now ready to tap the two holes to fit the ¼” NPT elbows….but could I find my pipe tap…….NO! I wasn’t ready to go buy another tap, knowing I had one somewhere. So I improvised by using a brass fitting that acted as the tap. I put the pipe and the fitting in my vise and as I tightened the vise, I turned the fitting. It worked!
Tapping.jpg


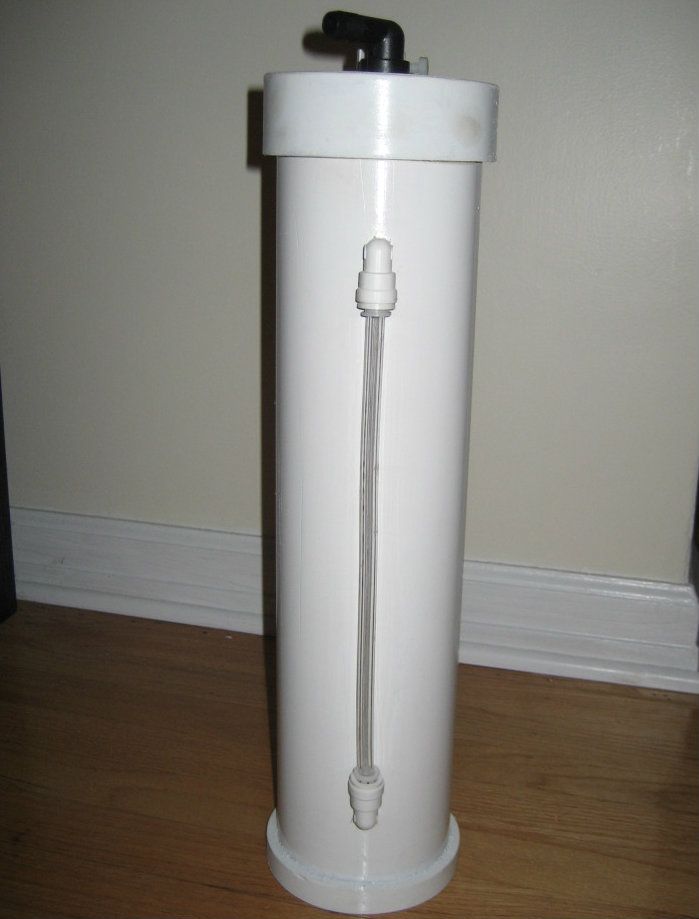
The elbows where installed and a piece of tubing was placed between the two elbows to act as the sight tube to note how much skimmate was in the container.
SkimmateContainer.jpg


TOP

An appromate ½” of 4” pipe was cut, and the remaining knock-off was glued to this piece. This assemble was then glued into the half-piece of coupling. This made the top. This top fit too snug, so a power rotary rasp was used to rasp the inside of this piece; until it fit easily on the four inch pipe.

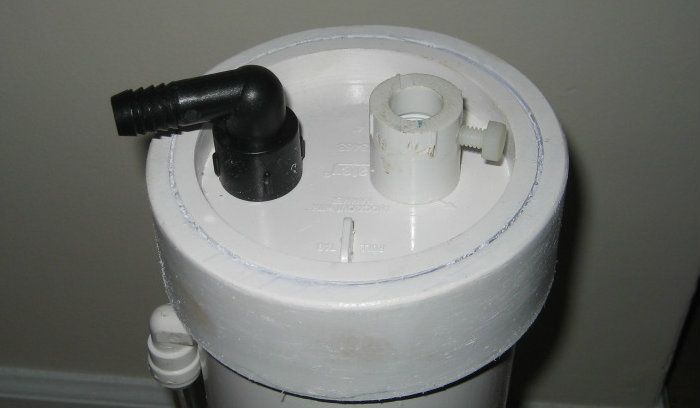
The longer threaded extender was cut just below the male threads. This small piece was used to attach the barbed elbow to the top (through a 7/8” hole), leaving it loose so that it could turn easily. The remaining piece of this coupling was drilled and tapped to accept the ¼ - 20 bolt. This piece was attached to the top with the remaining extender coupling through a second 7/8” hole. And here’s the top:
SkimmerContainerTop.jpg


The barb fitting will attach to the drain tubing from the skimmer cup while the other fitting will hold the float valve switch by tightening the Teflon bolt.


When I get it into place, I’ll add a final photo.
 

redfishbluefish

Officer Emeritus
Officer Emeritus
Thanks Taz!


On another forum I was asked what the cost would be if I included the stuff I already had (4” pipe and the float switch.) Well 110V float switches with the amps to drive motors are pretty costly, so here’s a cost breakdown using a relay with float switch from Aquahub. The other parts are priced from Home Depot online prices. The electric box will also serve as the project box for the relay. The extension cord will have the socket end cut off and be used to supply electricity to the outlet. Also note that this float switch has a threaded mount that would change the top cover installation (I think making it easier.)

Home Depot----------------------------------------------------$9.07
4” x 2 ft PVC Pipe-----------------$3.56***
Plastic 2 gang electric box --------$1.97
Outlet-----------------------------$0.59
Extension cord (6ft)---------------$1.47
Cover Plate------------------------$1.48
*** based on a 10ft length costing $17.79. I know my HD sells short lengths of pipe, but these costs are not available online, so I priced a 10 ft length cut to 2 ft.


Aquahub Stuff--------------------------------------------------$27.56
Float switch------------------------$6.99
DPDT Relay-------------------------$7.99
Relay Socket-----------------------$4.99
12V Wall Transformer--------------$7.59


So for an additional $36.63 (or a total of $49.18), you too can have one of these collectors. Darn, now it sounds expensive. That's why I like using stuff I have around the house...it's like you get it for nothing.
 

Fish Brain

Officer Emeritus
Officer Emeritus
Nice little build, I love the "sight glass"!

Even at $50, it's still a bargain compared to the $150-200 units!
 
Well thanks Paul, there goes my for sale thread...

nice job though mate! Maybe you can make me a floating one for in sump oooOOOOOOoooooo
 

redfishbluefish

Officer Emeritus
Officer Emeritus
Brandon, your sluge jug will sell….I guarantee it! Really, how many people on this site have a 12 inch saw, tap and dies, and the tools to build this? I can only think of maybe three….and I’m guessing at what they have in their shop. You have your jug fairly priced and it will sell.

For those who don’t want to cut off their fingers, check out Brandon’s sale for the Avast Skimmate Locker HERE. If you’re not a paid member and can’t hit a nail in the wall and want a skimmate locker, contact Brandon.
 

kschweer

Administrator
Staff member
Officer Emeritus
Moderator
Brandon, your sluge jug will sell….I guarantee it! Really, how many people on this site have a 12 inch saw, tap and dies, and the tools to build this? I can only think of maybe three….and I’m guessing at what they have in their shop. You have your jug fairly priced and it will sell.

For those who don’t want to cut off their fingers, check out Brandon’s sale for the Avast Skimmate Locker HERE. If you’re not a paid member and can’t hit a nail in the wall and want a skimmate locker, contact Brandon.

Lol...+1 Paul. That's an awesome little project you did. And I will agree it may seem a little beyond some people's ability. However, if more people realized how easy something like this is with the right tools it may be a different story. The right tools will make any project easier. Great build Paul and even seeing how easy this project can be I am still interested in Brandon's locker for my new build sometimes something that is up and running is more appealing than "putting in the work".
 
Lol Paul you can remove your link, it isn't a big deal. Your design is nice and all, but it is lacking some flair.

You know what, Paul, if you want me to wear 37 pieces of flair, like your pretty boy over there, Brandon, why don't you just make the minimum 37 pieces of flair?
 

redfishbluefish

Officer Emeritus
Officer Emeritus
You know what, Paul, if you want me to wear 37 pieces of flair, like your pretty boy over there, Brandon, why don't you just make the minimum 37 pieces of flair?


LOL….at first I didn’t get this (I don't get out much)...…searching quotes, I have a response:


You know what Pretty Boy, I do want you to express yourself, okay. And you don’t need 37 pieces of flair to do it.
 

TanksNStuff

Officer Emeritus
Officer Emeritus
Great build Paul. I never thought to use PVC pipe to make one but this seems like a very economical way to do it.

I built my own also, but it's much different than yours. I was looking for a way to make one that I could hide under my stand but be easily accessible to empty when it was full. However, I didn't have much room under the stand except about 3.5" width along the front... between the sump and the doors.

I decided to make mine out of some 1/4" acrylic sheets I had laying around and basically just constructed a 3" wide x 16" long x 16" high box with a top/bottom. I left about a 2" x 3" opening in the top to allow for the drain tube to enter and also enough room to place a float switch. Plus, this opening size is perfect for pouring out the skimmate without making a big mess. In hind sight, I would have preferred to make a removable top to make it easier to clean the interior of the container periodically.

Anyway, here's a pic of mine when I first made it. It doesn't show the pressure switch that I've since installed to turn off the skimmer should the skimmate level get too high.

IMG_0872.jpg


Here's a top-down closeup of the opening and you can see how it fits nicely between the sump and the edge of the stand. The doors will still close and the container is completely hidden under the stand!

IMG_0869.jpg


The bottom is slightly longer than the container because I had that piece already cut and didn't want to bother trimming off an inch when it wouldn't affect anything. It actually helps give it some stability too so it worked out fine.

As for the float switch that I installed later... I actually ended up getting a Pressure Switch from Avast Marine. This is basically the controlling part of their Top-Off Kit. If you look at that link, it's the outlet controller with the black tube (mine is blue tube) and the clear acrylic tube with the pressure sensor in it. When I bought it a few years ago, it came with it's own magnet holder and it was a bit cheaper than they are now. I'm suprised I can't find a pic of it installed. I'll try to take one tonight and post it.

The way the sensor works is you basically just plug the skimmer into the controlled outlet. If the water/skimmate level reaches the clear acrylic tube, it creates a pressure difference inside the tube and it cuts off power to the outlet. There's no moving parts to get stuck so this sensor is very reliable.

The conainer I made will hold hold about 3 gallons of skimmate... but the smell usually encourages me to empty it before it gets to that point. :eek:
 

redfishbluefish

Officer Emeritus
Officer Emeritus
George, your poop box looks great! I was actually kicking around the same idea of a rectangular box that fit into the end part of the stand between the two legs. I probably spent the last year or so mulling over how to do this. I actually have all the acrylic, but was still thinking about the actual details in the design.

Here are the things that held up going forward with the acrylic box (and eventually pushing me into the pipe design):

1. I’m overly anal and spend way too much time thinking about design details, which tend to put off these projects for months, if not years. (Look how long it took me to make my canopy.)

2. I haven’t been happy with the acrylic cuts I get off of my radial arm saw. Even with mounting the blade backwards (which helped), the cuts weren’t the cleanest. I also didn’t like getting hit with all that shrapnel-like acrylic shards….ouch, does that hurt. I was thinking about setting up my router table as a cut off tool to see if that gave me a cleaner cut, but just never got to it.

3. I’ve been too lazy to find and buy Weldon….and not sure which number to use…..(I think 4, but I’m not sure.)


Here’s what pushed me to look at the pipe design.

A. I started looking at the commercially available containers. They were all pipe like!

B. I have 4, ten foot lengths of 4” pipe left over from a DEP/EPA debacle (don’t ask!)

C. Four inch pipe easily fit into the end portion of my stand.

D. I did a little Pie-R-Squared calculation of the height of the pipe and was pleasingly surprised to find that the approximate height of my sump was a tad above a gallon in volume (for a four inch pipe). That was the volume of my current juice jug, which is way-more than enough….I empty my jug when it’s about a quarter filled….maybe every three or four weeks. I chuckled when I read that your container is three gallons….that would last me, as a guess, around half a year, if I could stand the smell. :p
 

TanksNStuff

Officer Emeritus
Officer Emeritus
George, your poop box looks great! I was actually kicking around the same idea of a rectangular box that fit into the end part of the stand between the two legs. I probably spent the last year or so mulling over how to do this. I actually have all the acrylic, but was still thinking about the actual details in the design.

Here are the things that held up going forward with the acrylic box (and eventually pushing me into the pipe design):

1. I’m overly anal and spend way too much time thinking about design details, which tend to put off these projects for months, if not years. (Look how long it took me to make my canopy.)

2. I haven’t been happy with the acrylic cuts I get off of my radial arm saw. Even with mounting the blade backwards (which helped), the cuts weren’t the cleanest. I also didn’t like getting hit with all that shrapnel-like acrylic shards….ouch, does that hurt. I was thinking about setting up my router table as a cut off tool to see if that gave me a cleaner cut, but just never got to it.

3. I’ve been too lazy to find and buy Weldon….and not sure which number to use…..(I think 4, but I’m not sure.)


Here’s what pushed me to look at the pipe design.

A. I started looking at the commercially available containers. They were all pipe like!

B. I have 4, ten foot lengths of 4” pipe left over from a DEP/EPA debacle (don’t ask!)

C. Four inch pipe easily fit into the end portion of my stand.

D. I did a little Pie-R-Squared calculation of the height of the pipe and was pleasingly surprised to find that the approximate height of my sump was a tad above a gallon in volume (for a four inch pipe). That was the volume of my current juice jug, which is way-more than enough….I empty my jug when it’s about a quarter filled….maybe every three or four weeks. I chuckled when I read that your container is three gallons….that would last me, as a guess, around half a year, if I could stand the smell. :p


OK, now you have me worried Paul! Does your wife know you're into that sort of thing? :eek:

Basics on Weldon Products:
Weldon #4 is most commonly used, but you could use #3 also (it just sets a bit faster than #4). #16 is good for repairs as it's a thicker substance and I think dries even faster than 3. Not good for trying to line up edges though due to the quick set times.


I thought the PVC was a great idea and with your site tube it fixes the problem of not knowing when it's full. Yes, mine is way bigger than it needed to be due to the smell after a week or two anyway... but I'm not worried about it when I go away on vacation for a week or two. ;)
 

ecam

Administrator
Staff member
Board of Directors
Officer Emeritus
NJRC Member
Moderator
Paul. Sounds like you have a growing business venture. Once your done with soccer. Lol. Awesome job!!!
 

fatoldsun

NJRC Member
Nice job but seriously thanks for adding to my holiday stay-cation to-do list. Between the wife and kids I barely got a water change in and I've been home since Saturday. Anyway I'm not sure I'm ready for one of these. My collection cup holds a 1/2 gallon and it can easily fill in 2 days
 

redfishbluefish

Officer Emeritus
Officer Emeritus
It's been a little over two years since I built these skimmate containers, and I just wanted to update my experience with them. First off, I couldn't live without a container to collect skimmate. Now the good news.....I've found that the sight tubes on the sides (which are a pain to install), aren't really necessary. I really never used them, and what caused me to empty these things was the odor. After about a month you start to notice this stench, and this olfactory sensor tells you that the containers needed to be emptied.....most times, about 1/3 full. So with no sight tubes, it makes this build very easy.


Over the past two years, the emergency float to turn off the skimmer only happened once, when the skimmer decided to puke.....and it worked flawlessly.


If you don't have a skimmate container, and have the DIY bug, I'd highly suggest building one of these.
 
I have done a similar thing. I got a 5 gallon bucket at Home depot, they make a screen top with a rubber gasket for these. I drilled into the top and use a barb to attach my skimmer to drain. I then used a small piece of flex to create a hole in the top with a sewer cap and a screw top to fill with a carbon bag and allow for venting. This prevents any smells. I also put in a float valve so that when it gets full, my apex turns off the skimmer and alerts me.

I will see if I have a pic to share.
 

Paul B

NJRC Member
I also have always used a skimate container. Mine is a 5 gallon bucket and for the shut off switch I just brought two wires from the GFCI that controls the pump to the bucket. The neutral and the ground. When the water hits those wires, the GFCI trips and the pump stops. I also use a similar switch under my hot water tank and boiler to shut off the electric valve in case of a leak so I don't get a flood.
It amazes me that some people don't have a collectuion system on their skimmer. I would be emptying it every day

 
Top