Paul I have the Swc extreme 150 from my old tank if you want to borrow it till your new pump gets here.
-
Folks, if you've recently upgraded or renewed your annual club membership but it's still not active, please reach out to the BOD or a moderator. The PayPal system has a slight bug which it doesn't allow it to activate the account on it's own.
You are using an out of date browser. It may not display this or other websites correctly.
You should upgrade or use an alternative browser.
You should upgrade or use an alternative browser.
Inherited 90
- Thread starter redfishbluefish
- Start date
Thanks for the kind words @BuGG . Here's the Reader's Digest version just for you: I built an equipment cabinet. Came out good! Still need to build the doors. 
@greybolt03 , thanks for your generous offer. However, with Amazon Prime, I had the new pump yesterday, and I'm already making dirty skimmate.....until that POC Atman dies. If anyone has a Jebao DC2000, please let me make measurements to see if that would fit this skimmer. I really need an alternative pump, and by appearance, that's a possibility.
@greybolt03 , thanks for your generous offer. However, with Amazon Prime, I had the new pump yesterday, and I'm already making dirty skimmate.....until that POC Atman dies. If anyone has a Jebao DC2000, please let me make measurements to see if that would fit this skimmer. I really need an alternative pump, and by appearance, that's a possibility.
Yet Another Vortech Power Holder
After yesterday, sort of a laid back day today. Put the furniture back, cleaned up, and did a couple small things on the cabinet. Cut the grove for the pH wire a bit deeper....and while I had the shelf out, took a picture of the inside of the Belly of the Beast.....spaghetti....I really didn't want it to look like that. Need to work on that.

I also reworked the Vortech power supply holder to accommodate the fatter two units. What I simply did was cut off one of the original holders, and built two new ones, and attached them to the three original small ones. Also increased the slot in the bottom to accept either centered wires or off-set wires.
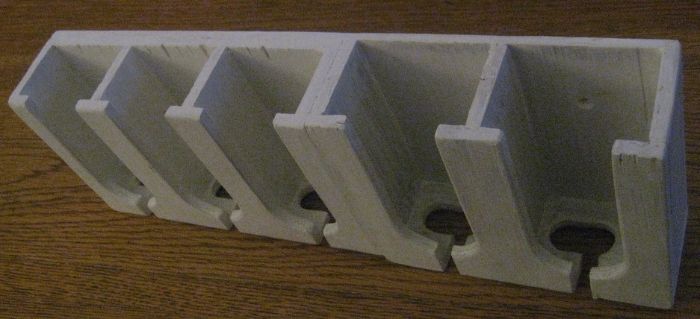

You'll notice two open slots.....never know when I'll need to add yet another Vortech. Now the one thing I didn't do was to find out the size of the QD power supplies. Maybe I'll just have to build a third holder.
FLOAT SWITCH FOR SKIMMATE CONTAINER
The Atman skimmer pump that totally shorted out (blew the 15 Amp fuse in the PC 8), also cooked the float switch and relay that was used as the "kill" switch for the skimmate container. Although I have an extra JBJ ATO, which could be used, I decided to just rebuild the relay/float switch.....for less than five bucks. Ordered up a new relay from Amazon for $3.54.

And a float switch from eBay for $1.00 (actually ordered 5 of these....can never have enough float switches)

The only problem with the float switches is that I'll have to wait forever, considering they are on a slow boat from China.
After yesterday, sort of a laid back day today. Put the furniture back, cleaned up, and did a couple small things on the cabinet. Cut the grove for the pH wire a bit deeper....and while I had the shelf out, took a picture of the inside of the Belly of the Beast.....spaghetti....I really didn't want it to look like that. Need to work on that.

I also reworked the Vortech power supply holder to accommodate the fatter two units. What I simply did was cut off one of the original holders, and built two new ones, and attached them to the three original small ones. Also increased the slot in the bottom to accept either centered wires or off-set wires.


You'll notice two open slots.....never know when I'll need to add yet another Vortech. Now the one thing I didn't do was to find out the size of the QD power supplies. Maybe I'll just have to build a third holder.
FLOAT SWITCH FOR SKIMMATE CONTAINER
The Atman skimmer pump that totally shorted out (blew the 15 Amp fuse in the PC 8), also cooked the float switch and relay that was used as the "kill" switch for the skimmate container. Although I have an extra JBJ ATO, which could be used, I decided to just rebuild the relay/float switch.....for less than five bucks.
 Ordered up a new relay from Amazon for $3.54.
And a float switch from eBay for $1.00 (actually ordered 5 of these....can never have enough float switches)

The only problem with the float switches is that I'll have to wait forever, considering they are on a slow boat from China.
Tidbits
I started working on the doors for the cabinet today, played with the skimmer pump and impellers. and started sanding the stand in anticipation of painting that flat black.
I made the final decision on the door for the upper part of the cabinet. I simply screwed the door parts together (pocket screws, with no glue) without a panel.....also no glass or plexi, as mentioned above. That top part of the stand will be use to display something....and match the open panel in the stand. Here's what is in there now....a glass fish eating a blow fish.

When I got the new Atman pump a two days ago, I put it in the skimmer as is....that is, with the stock needle impeller. I wasn't crazy about the skimmate being produced, so I opened up the pump and went to put in the mesh wheel impeller
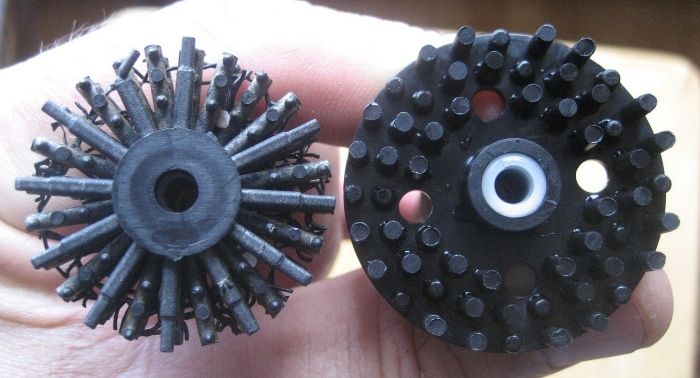
What I noticed was the magnet on the mesh wheel was noticably smaller. We'll have to see if this changes anything.
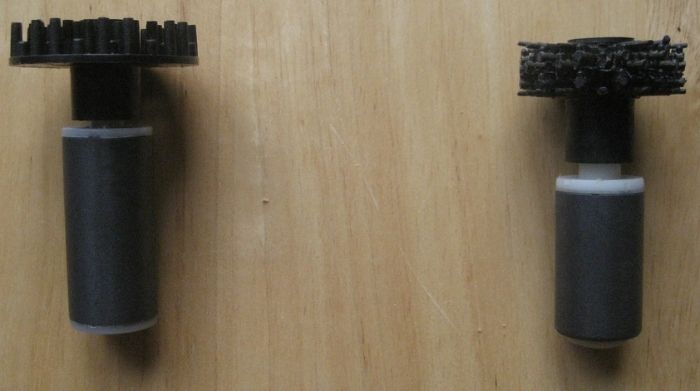
I also started preparing the stand for a new paint job. Pulled the doors off and spend an hour or so sanding them. Didn't realize how bad of a shape they were in. The one door on the skimmer end of the sump had the paint peeling off on the inside......I'm guessing from salt splashing. I reprimed that inside door panel.


I started working on the doors for the cabinet today, played with the skimmer pump and impellers. and started sanding the stand in anticipation of painting that flat black.
I made the final decision on the door for the upper part of the cabinet. I simply screwed the door parts together (pocket screws, with no glue) without a panel.....also no glass or plexi, as mentioned above. That top part of the stand will be use to display something....and match the open panel in the stand. Here's what is in there now....a glass fish eating a blow fish.

When I got the new Atman pump a two days ago, I put it in the skimmer as is....that is, with the stock needle impeller. I wasn't crazy about the skimmate being produced, so I opened up the pump and went to put in the mesh wheel impeller

What I noticed was the magnet on the mesh wheel was noticably smaller. We'll have to see if this changes anything.

I also started preparing the stand for a new paint job. Pulled the doors off and spend an hour or so sanding them. Didn't realize how bad of a shape they were in. The one door on the skimmer end of the sump had the paint peeling off on the inside......I'm guessing from salt splashing. I reprimed that inside door panel.


So I've been sitting here twiddling my thumbs waiting for a new 3/16 router bit to come in to finish the doors for the equipment cabinet. I couldn't find the bit I had (probably borrowed and never returned) and ended up ordering one from a company that works at a snails pace. {No more lending out tools!!! So don't ask!!!} The company is right here in Brooklyn, NY....maybe 15-20 miles as the crow flies. Took them a week to print a label!!!! It's now stuck in the pit of the USPS system in Kearney NJ. I can't begin to tell you how many items I've purchased that have never come out of the Black hole in Kearney. I know I've lost two, 200 gallon salt boxes in Kearney, two separate times. Who knows if and when it will emerge from that Black Hole.
So out of frustration I looked at other projects I could start. The one thing that's been bothering me is the ugly look of my ATO reservior. It's a water bottle on a five gallon bucket.....and it sits just to the right of the tank.

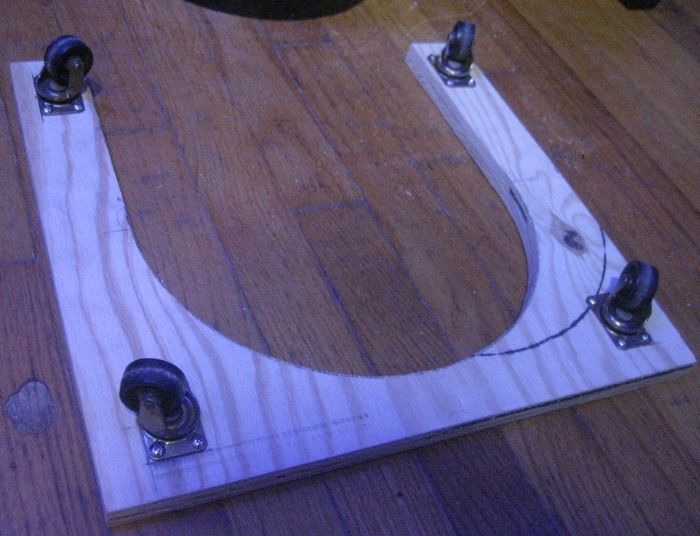
What I want to build is a three sided cabinet with a similar simple design of my stand with the two panels. I started this project today by laying out the base, which will have casters to ease in pulling this out to replace the water jug. It looks simple, but I'll bet I spent 1 1/2 hours laying it out.

Tomorrow I'm off to HD to pick up more 3 inch stock to make the panels....and then stuck again waiting for this router bit. Back to twiddling my thumbs!
So out of frustration I looked at other projects I could start. The one thing that's been bothering me is the ugly look of my ATO reservior. It's a water bottle on a five gallon bucket.....and it sits just to the right of the tank.

What I want to build is a three sided cabinet with a similar simple design of my stand with the two panels. I started this project today by laying out the base, which will have casters to ease in pulling this out to replace the water jug. It looks simple, but I'll bet I spent 1 1/2 hours laying it out.


Tomorrow I'm off to HD to pick up more 3 inch stock to make the panels....and then stuck again waiting for this router bit. Back to twiddling my thumbs!
Cool idea for the ato reservoir (that a tough one to spell). I too have adopted a no tool loaning policy unless I'm present. It never fails the second you lend out something even if you never use it, you need it and can't remember who has it and for how long they've had it. Lol
It's now stuck in the pit of the USPS system in Kearney NJ. I can't begin to tell you how many items I've purchased that have never come out of the Black hole in Kearney.
That's my home town. It did seem strange growing up there that every Christmas the PO gave out gifts to the locals.
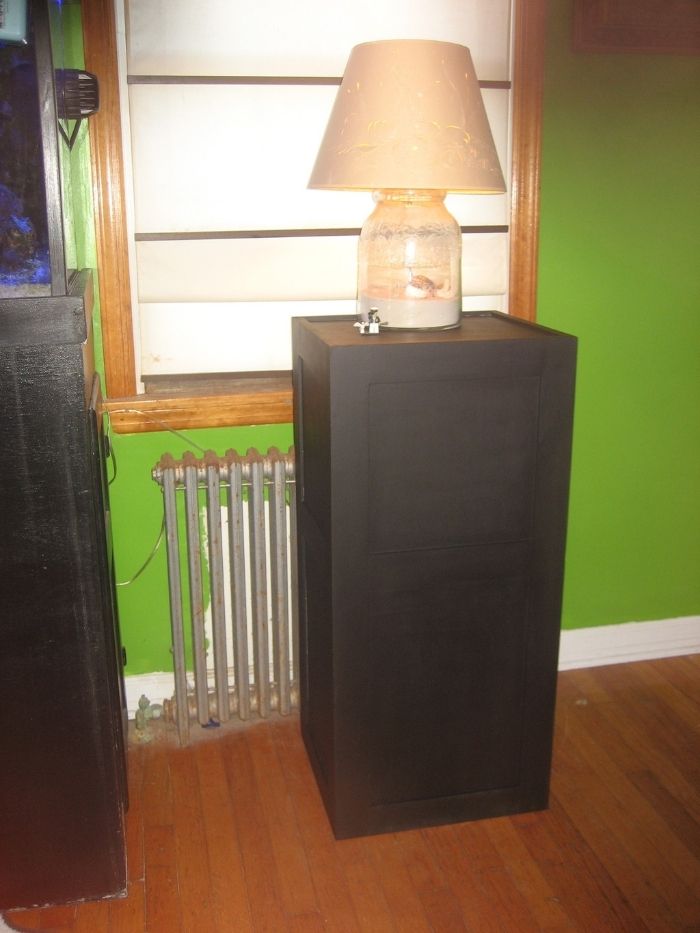
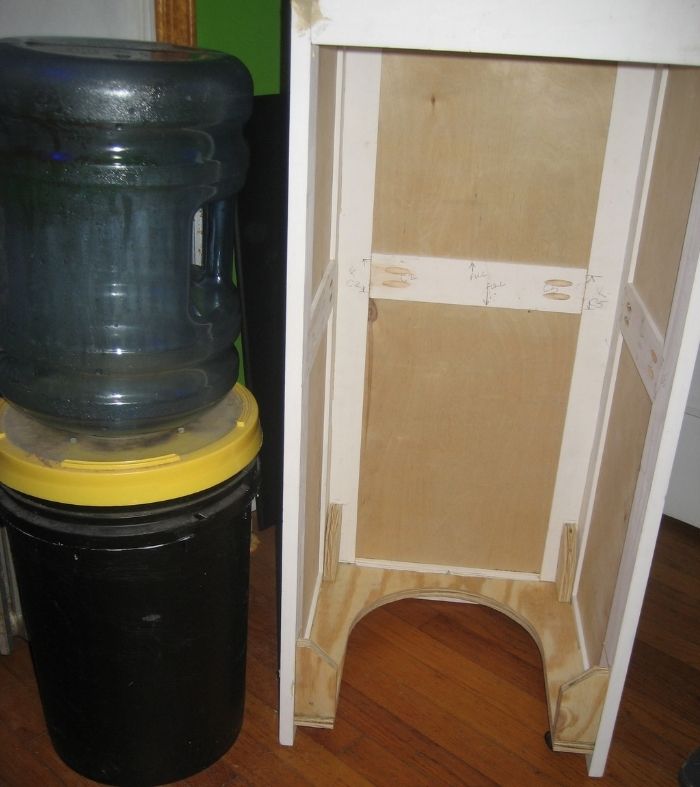
Well Mark, that Router bit finally came out of the black hole and arrived and I rough finished the ATO Reservoir cabinet. It's a simple three sided cabinet with casters on the bottom to easily pull the cabinet out to put on a new water bottle. The woodwork actually sits about a quarter inch off the floor to allow the casters to roll. Here's the cabinet with screw holes just filled with wood filler. Tomorrow I'll sand and prime.

I'm now working on some sort of indicator that will let me know when the water bottle is empty. Not sure what I'll be doing....still kicking that one around.


I'm now working on some sort of indicator that will let me know when the water bottle is empty. Not sure what I'll be doing....still kicking that one around.
I'm now working on some sort of indicator that will let me know when the water bottle is empty. Not sure what I'll be doing....still kicking that one around.
How about a little window like you built on your reactor?
How about a little window like you built on your reactor?
I like your thinking Mike!
I finally got around to finishing up the equipment cabinet by finishing the doors. The doors have no hinges. They are attached by having two dowels on the lower portion of the door that fit into holes on the faceframe.
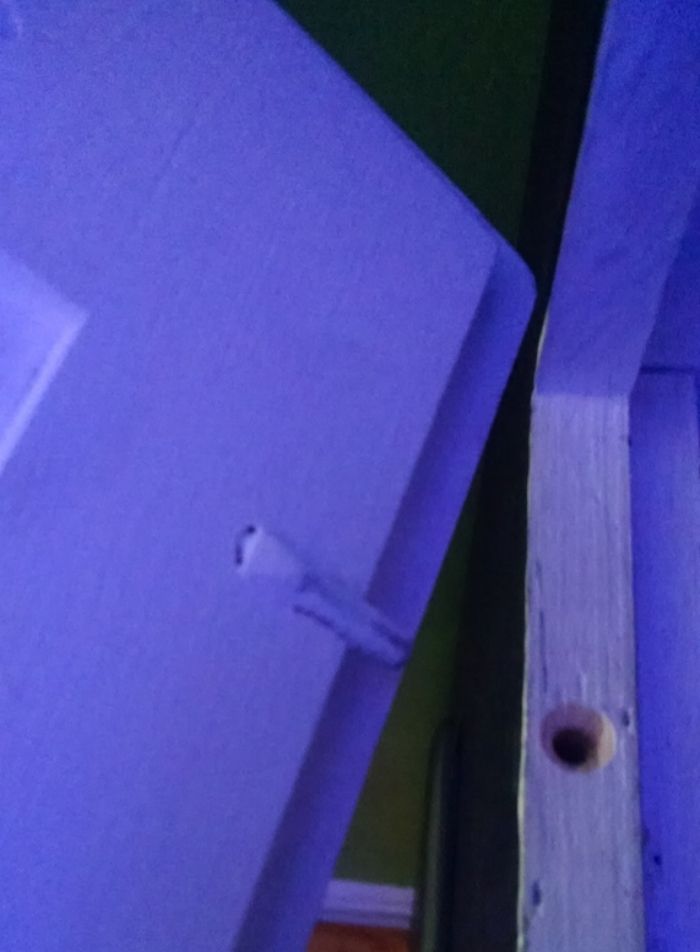
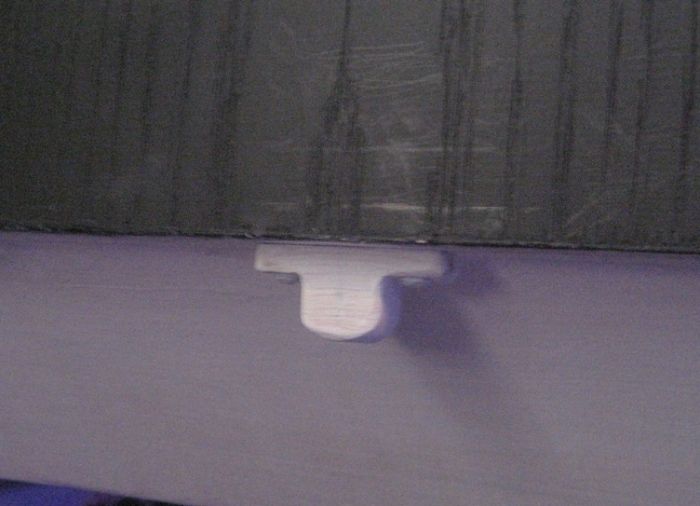
On the top part of each door, centered on the inside portion of the door frame, is a Neo magnet that was epoxy glued into a depression. This aligns with another Neo magnet that is epoxy glued into a wood flange piece (I call it a Mickey Mouse ear).
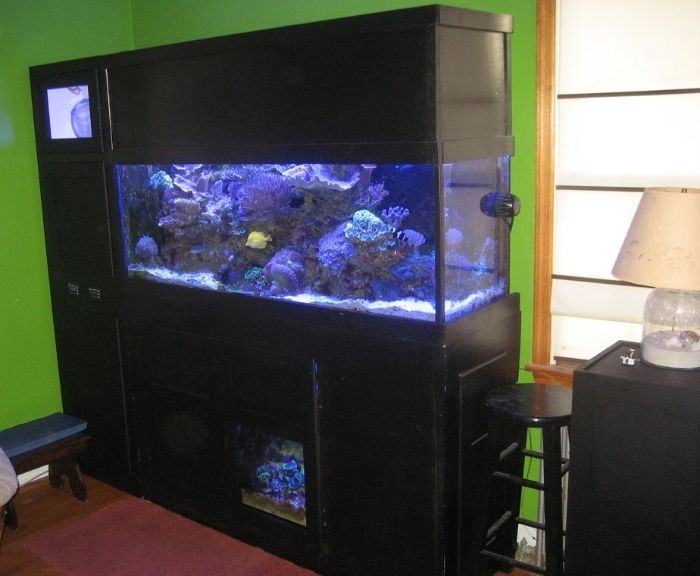
Here is the finished cabinet.
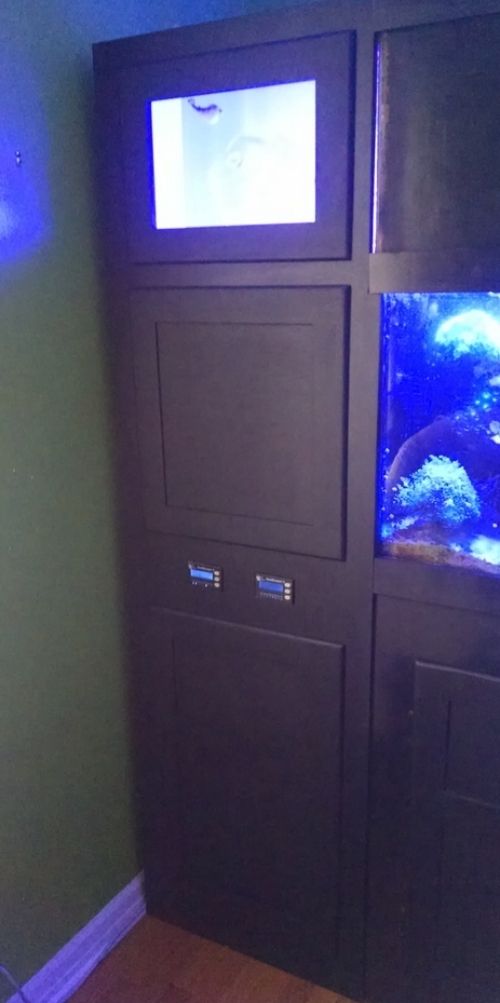
The upper door was intentionally build without the panel. It is lit by spillover light from the canopy.....the fan hole in the side of the canopy. This area will be used to display stuff. Here's two examples.


Still need to do a couple little things to totally finish....run new tubing lines for the dosing pumps; trim molding installed; repaint stand and canopy flat black to match equipment cabinet.

On the top part of each door, centered on the inside portion of the door frame, is a Neo magnet that was epoxy glued into a depression. This aligns with another Neo magnet that is epoxy glued into a wood flange piece (I call it a Mickey Mouse ear).

Here is the finished cabinet.

The upper door was intentionally build without the panel. It is lit by spillover light from the canopy.....the fan hole in the side of the canopy. This area will be used to display stuff. Here's two examples.


Still need to do a couple little things to totally finish....run new tubing lines for the dosing pumps; trim molding installed; repaint stand and canopy flat black to match equipment cabinet.
Same here Kevin. Not originally planned, but when I put in that false wall with nothing incorporated into that wall.....and the light spilling over into this section........and with having the similar open panel in the sump door of the stand, I thought it would work out well. I'm liking it, and my wife likes the glass fish going to eat the blow fish.
Thanks. I'm just wondering if it's too much black.


